Tag Archive for: Product Development & Management Page 8
Tag Archive for: Product Development & Management
Utilize Artificial Intelligence and Natural Language Processing to Produce High-Quality Requirements with Jama Connect Advisor™
When discussing the requirements management process with my clients, I’ll often say, “the first step in maturing your requirements management process is to use an enterprise tool such as “Jama Connect.” This allows for scalability of their process and more importantly, the ability to manage change across their product lifecycle. Features such as the Review Center, Baseline Capture and Compare, Collaboration, Suspect Triggers and Variant Management are all necessary parts of the process that allow for tight control and the ability to meet the most rigorous of standards. Once that message becomes clear to my clients and the benefit realized, the next aspect of the conversation is, “Can you write GOOD, high-quality requirements?” It’s one thing to get your requirements into a formal tool, but what if the requirements aren’t any good to begin with? As the old adage says, “garbage in, garbage out”. This problem becomes magnified to a dangerous extent when your requirements define life-saving devices or mission-critical hardware and software.
How Jama Connect® Uses Natural Language Processing to Improve Quality
Enter Jama Connect Advisor to the conversation. Jama Connect Advisor is a state-of-the-art requirements authoring guide and optimizer powered by natural language processing that helps a system engineer or a product developer write effective, well-organized requirement specifications based on industry-accepted INCOSE (International Council on Systems Engineering) rules and the EARS (Easy Approach to Requirements Syntax) notation.
Jama Connect Advisor allows you to analyze requirements text to provide a quality score based on the INCOSE and/or EARS rules the user chooses to validate against. This analysis can be done on a single item or “in bulk” against multiple requirements. Reports provide a detailed overview of the quality and score of the requirements. This allows for requirements authors to iterate on their requirements and improve the scores, ultimately resulting in better quality requirements across the entire lifecycle.
When all of your downstream requirements and tests are dependent on how a requirement is defined, it is extremely important that the quality of the requirements are there from day one. With the proliferation of Artificial Intelligence and Natural Language Processing, it is a natural extension to apply these techniques to requirements management creation and elaboration.
A Continued Investment in AI and How it Relates to Better Requirements Management
Jama Software continues to make strides in this area and we have recently relaunched our Jama Labs Website. Some of the exciting functionality we are exploring includes:
Automatically detecting high-risk areas in requirements by analyzing review comments
AI-generated test cases derived from requirements
Auto-scanning existing IP, to discover reuse candidates, which improves efficiency and saves time.
The maturity and scale of your requirements process doesn’t end with managing them in a formal tool. There must be a focus on defining good, quality requirements and the ability to detect and report on the quality in real time easily. This visibility allows for authors to quickly update their requirements for better quality from the beginning. When everything downstream depends on it, the quality of your requirements truly does matter.
Three Key Lessons of Semiconductor Requirements Engineering
Semiconductors are ubiquitous in our modern life. The thermostat that regulates the temperature in our home overnight, a cellphone with an alarm that wakes us up, our power toothbrush, and the coffee maker that has the morning’s cup already brewed as we walk into the kitchen. Semiconductors make these conveniences and millions more per day possible, most without our awareness or intervention at all.
It’s not hard to imagine requirements for a thermostat, a cellphone alarm, a toothbrush, or a coffeemaker. What about the electronic components that control each of these devices, along with so many others that function transparently in our lives throughout our day? Whether they are the latest generation GPUs powering streaming media in datacenters, CPUs powering laptops on which we work, network chips executing communications protocols, or FPGAs warning us of vehicles in the lane adjacent to our own car, semiconductor products are essential ingredients of our daily lives.
In this blog post, Sarah Crary Gregory, a member of the Industrial Innovation Committee of the IEEE Requirements Engineering Conference, discusses three lessons learned in semiconductor requirements engineering.
Do semiconductor products have requirements?
Sarah Crary Gregory: Yes.
That’s the simple answer. Reality is more complicated.
Semiconductor products have definitional data – content that describes the functionality of the product, expectations of the quality of those functions, and constraints that the product must exist within. Whether those statements are written in Natural Language or with a different notation will depend on several factors, including the type of product under design, the level of abstraction of the data, and the norms of both the company and the structure needed to manage the data itself.
Semiconductor products have little or no utility without the system of systems of which they’re a critical constituent part. Those broader systems – a cellphone, a communications satellite, a car – have their own requirements. They may not always be directly included in the requirements for the semiconductor part itself, but they inform the structure and relationships of the definitional data – requirements as well as architecture – of that semiconductor.
Let’s take the use case of blind spot detection in an automobile. At the highest level, the user requirements cover one primary user class – “driver” – but two distinct actors: 1) the driver of a car who intends to change lanes, and 2) the driver of the car in an adjacent lane. Their goals are the same and implicit: reach their destinations safely. If both cars are equipped with blind spot sensors, both drivers may be notified by their respective vehicle of a potentially dangerous situation. The existence of that notification, its accuracy, and how that notification is delivered – audible signals, visual references, even potentially an override function in which the car itself avoids the collision – all are requirements.
Of course, users don’t walk into a car dealership showroom with a Product Requirements Document (PRD) detailing the functionality and performance expectations of the blind spot detection system for their new car. They may expect the feature, but trust that the automobile manufacturer has defined, developed, and delivered that functionality, and it will “just work.” Designers of the automobile will consider and specify many elements of what blind spot detection must do. For this feature, additional 3rd party standards from ISO or the National Highway Transportation Safety Administration in the US (along with other regulatory bodies) may govern implementation details as well.
As the design of the feature is decomposed into its constituent parts – sensors, digital signal processors, lights – the characteristics of these elements will be specified, often as requirements. How bright must a visual signal to the driver be? Where does that need to be located for easy reference without distracting from the task of driving the car? How loud must the audio signal be? Is there a requirement that it be audible over any media playing in the car at the same time? How rapidly must a signal from the sensor be conveyed to the blind spot detection system to ensure prompt notice to the driver? Again, independent safety standards might govern some elements of these features. Manufacturers’ design standards may lead to other requirements for how the signal is presented to the user, within the constraints of the standards.
Many of these details have requirements implications for the various electronics including FPGAs and CPUs that control the systems of the car. The automotive company will select semiconductor components that satisfactorily meet its requirements. Those semiconductor components themselves must demonstrate that they meet the automotive company’s requirements. Some of this demonstration is accomplished via testing, but it is also assessed through the definitional data of the semiconductor product itself – including its requirements.
What standard or template applies to semiconductor requirements?
Gregory: The short answer: There often is not one. That’s an unsatisfactory answer, of course, worthy of further exploration.
Unlike the Avionics (DO-178C/DO-254, and others), Automotive (ISO 26262, IATF 16949), Industrial Automation (IEC 61508), or Medical Devices (ISO 13485 and others) industries – among many others – the Semiconductor industry does not have one or more guiding industry standards that define the product’s data architecture. The data defining a product often reflects the mental model(s) of its authors, the company or team’s legacy practices, or the best effort made to capture information in the tool(s) available, often Word or Excel. Some companies may use sophisticated modeling for system architecture but specify some requirements with natural language requirements written in the EARS syntax to ensure readability.
In practice, this may mean that many different models exist in a semiconductor company, including the standards-defined data models above. An FPGA company may develop products that are targeted for the automotive sector. Depending on the nature of those products and how they relate to safety-critical systems, a data model based on the ISO 26262:2018 standard may be required. The same company may also deliver to Avionics or Medical Device companies and need to demonstrate requirements management consistent with those standards. Careful data architecture in the development of the Requirements structure may deliver a model that’s applicable across many standards. Each may still require different documentation output to demonstrate that the product will be able to be certified as safe to use.
So – sometimes semiconductor companies do need templates, at least for some components. Here’s an example that would apply for our Blind Spot Detection system.
Depending on the component being developed, SEooC (Safety Element out of Context) rules may apply to the supplying semiconductor company, even if their primary business is not supplying the automotive market. A formal Hazard Analysis and Risk assessment (HARA), Functional Safety Concept and Technical Safety Concept, ASIL decomposition may be required to provide compliance to ISO 26262. Jama Software provides a templated data model that facilitates reuse for this this type of development. This is especially helpful for semiconductor companies with a broad and diverse range of customers and products in their portfolio. Components that might fill a niche in a safety standard-defined market can be demonstrated to be compliant without the need to maintain separate infrastructure for their data. Other products and components at the same company can be in the same infrastructure, managed by templates suitable for their needs.
What are requirements for a Requirements Management System (RMS) for the Semiconductor segment?
Gregory: Semiconductor Requirements Management requires both stability and flexibility.
Stability: In the absence of a domain-specific standard that governs data objects and their relationships, semiconductor companies often must define and govern the structure themselves. Being able to design an information architecture that both reflects the common practice in use today – even if in Excel or Word – but takes advantage of features of an RMS that add rigor and discipline to requirements reviews and traceability is the sweet spot for semiconductor companies looking to improve their requirements management game.
Flexibility: A robust RMS solution will enable one or more “locally-standard” data models to be created that reflect the definitional data relationships of the system under design and its various components at a particular company. That data model must be governed to ensure that it is used consistently. Changes to the data model must be addressed through disciplined change management practices.
Different levels of abstraction of data may require different management solutions. Use Cases may be modeled in a MBSE tool or captured in UML-compliant text form in Jama Connect®. Product requirements and derived component requirements, potentially through multiple levels of abstractions, trace back up to the Use Cases. Connecting EDA tools, simulation environments, work tracking systems, and validation environments ensures that the overall system meets the ISO9001:2015 expectation of a Quality Management System (QMS) that ensures that a product satisfies customer expectations.
Jama Connect is an industry-leading Requirements Management system that excels at both Stability and Flexibility. Working in collaboration with a Jama Software solution team, a customer from the semiconductor sector defines an information architecture that represents its data today, and that can evolve to take advantage of the powerful features afforded by Jama Connect. Design and governance of the information architecture rests in the hands of the company, with Jama support available to enable changes as the company’s data needs change.
The most important requirement for a requirements management system in any domain is that the users – marketing, strategic planning, architecture, engineering, among many other roles – are willing to use it! Jama Connect is easy to learn, satisfying to use, and a robust single source of truth for semiconductor product definitional data. Every semiconductor company’s products can have specific information architecture needs. Reach out to us at Jama Software today to learn more about how the flexibility and stability of Jama Connect can meet you where you are to solve your company’s semiconductor requirements management challenges.
ASIL: Automotive Safety Integrity Level. ASIL is a risk classification system defined by the ISO26262 – Functional Safety for Road Vehicles standard.
CPU: Central Processing Unit. The CPU is the primary processor in a given computer. A single computer can contain multiple discrete CPUs, called “cores.”
FPGA: Field Programmable Gate Array. An FPGA is a configurable integrated circuit that can be programmed and reprogrammed repeatedly after purchase and installation.
GPU: Graphics Processing Unit. A GPU is an electronic circuit specifically designed to process digital images and accelerate computer graphics rendering. GPUs are critical in domains as diverse as computer gaming, autonomous driving, and AI image rendering.
HARA: Hazard Analysis & Risk Assessment. A HARA is a standardized method of performing a risk assessment and defining safety measures in compliance with the ISO26262 – Functional Safety for Road Vehicles standard.
RMS: Requirements Management System. Although requirements may be captured in many formats and many types of system, a RMS is purpose-built to manage the definitional data of a product, service, or system at multiple layers of abstraction. RMS standard features minimally include the ability to define and implement an appropriate schema for the collective data, and capabilities for baselines, version control, reviews and approvals, and disciplined change control.
SEooC: Safety Element out of Context. A SEooC is a software or hardware element of a system that is designed and developed according to the standards established by the ISO26262 – Functional Safety for Road Vehicles standard. However, it is developed “out of context” of any particular implementation. In our example above of the automobile blind spot detection system, the sensors and other electronic components that are integrated into that feature are likely developed as generic devices that could serve multiple purposes. Because they were developed in accordance with the standard, they are potentially suitable to use for multiple safety-critical purposes.
Strengthening Cybersecurity in Regulated Markets: How Jama Connect® Enhances Risk Management in Product Development
Discover how Jama Connect® empowers product development teams in regulated markets like aerospace, automotive, and medical devices to integrate cybersecurity and safety risk management with requirements management
In today’s connected world, cybersecurity is a critical concern for product development in regulated markets. According to a recent report by Cybersecurity Ventures, cybercrime is predicted to cost the world $10.5 trillion annually by 2025, underscoring the growing risks facing industries that rely on connected products.
As products become increasingly software-driven and connected, they present new vulnerabilities that require robust security measures. Industries such as aerospace, automotive, and medical devices must navigate complex cybersecurity regulations to protect sensitive data, ensure product safety, and maintain compliance with evolving standards. Failure to address cybersecurity risks not only jeopardizes user safety but can also lead to costly delays, recalls, regulatory penalties, and reputational damage.
The Importance of Cybersecurity in Regulated Markets
Regulated markets operate under strict guidelines to protect data, ensure operational integrity, and maintain public trust. Cybersecurity compliance involves adhering to laws, standards, and regulatory requirements established by governments and industry authorities to safeguard digital information and systems from threats like unauthorized access, data breaches, and cyberattacks.
Recent incidents underscore the urgency of robust cybersecurity measures:
Medical Devices: The U.S. Food and Drug Administration (FDA) issued updated guidance requiring medical device manufacturers to submit cybersecurity plans as part of their premarket submissions. This move follows increasing concerns about vulnerabilities in connected medical devices that could jeopardize patient safety and data security.
Automotive Industry: A notable cybersecurity breach involving a major automaker demonstrated how connected vehicles can be remotely accessed and controlled. This incident has accelerated the push for stricter compliance with ISO 21434, the international standard for automotive cybersecurity risk management.
Aerospace & Defense: Cyberattacks targeting defense contractors have highlighted the need for stringent cybersecurity protocols. The implementation of DO-326A and other cybersecurity standards is becoming increasingly critical to protect sensitive information and ensure the safety of airborne systems.
Jama Software’s Approach to Cybersecurity in Regulated Markets
Jama Software recognizes the critical importance of cybersecurity in regulated industries and has integrated out-of-the-box cybersecurity risk management capabilities into its industry-specific frameworks for Jama Connect. This integration facilitates a proactive approach to cybersecurity across various sectors, including airborne systems, automotive, and medical devices.
Aerospace & Defense
Aircraft, system, and subsystem manufacturers and their suppliers benefit from a customizable solution with a robust REST API aligning all cybersecurity activity with an integrated DevSecOps CI/CD pipeline, easy collaboration and reviews involving internal and external teams, and customizable reports to demonstrate compliance with the “Airworthiness Security Process Specification” (DO-326A). Jama Connect for Airborne Systems provides a framework to identify potential cyber threats, assess vulnerabilities, and implement security measures.
Automotive Industry
The shift towards software-defined vehicles has introduced new cybersecurity challenges. Jama Connect for Automotive offers OEMs and suppliers the capability to develop necessary work products that comply with ISO 21434 for cybersecurity management. It offers comprehensive cybersecurity diagnostics including Threat Analysis and Risk Assessment (TARA) templates and reports, as well as case management, progress monitoring, and reporting features to demonstrate compliance. By facilitating collaborative planning, validation, and alignment, it reduces risks through enhanced collaboration among specialized teams, removes guesswork from threat analysis, and accelerates project launches through efficient reuse of components.
Medical Device Industry
For medical device manufacturers, managing cybersecurity risk under standards like ANSI/AAMI SW96:2023 is complex. Jama Connect for Medical Devices harmonizes cybersecurity and safety risk management, simplifying complex risk evaluations and accelerating responses to threats. This integration reduces complexity, increases efficiency in managing risks, and ensures comprehensive documentation of traceability, which is crucial for regulatory compliance and patient safety. By embedding cybersecurity risk management into its industry-specific frameworks for Jama Connect, Jama Software empowers organizations to integrate cybersecurity risk management into product development processes for efficient and proactive identification, evaluation, and mitigation of cybersecurity risks, compliance with regulatory standards, and enhanced overall security posture of their products.
As cybersecurity threats continue to evolve, regulated industries must take proactive steps to safeguard their products, data, and users. The growing complexity of cybersecurity regulations highlights the need for robust risk management frameworks that integrate security into every stage of the product development lifecycle. By leveraging Jama Connect’s industry-specific cybersecurity capabilities, organizations can streamline compliance efforts, enhance collaboration, and mitigate risks more effectively. Investing in secure-by-design practices today ensures a safer and more resilient future for the products and industries that shape our world.
Note: This article was drafted with the aid of AI. Additional content, edits for accuracy, and industry expertise by Mario Maldari and McKenzie Jonsson.
Overcoming Top Challenges in the Energy Storage Industry with Jama Software
From aging infrastructure, to changing regulations, Jama Software® helps engineering teams meet demand with innovative, scalable solutions.
This blog explores the top challenges in the industry and how Jama Software’s cutting-edge requirements management solutions can help overcome them, including:
The energy storage industry is undergoing rapid transformation. Faced with aging infrastructure, evolving regulations, the push for energy efficiency, rising global demand, and cost pressures, engineering teams are tasked with delivering innovative, scalable solutions. This whitepaper explores the top challenges in the industry and how Jama Software’s cutting-edge requirements management solutions can help overcome them.
The Challenge
Decades-old energy infrastructure — from power plants to grids and pipelines — requires urgent modernization to prevent failures and increase resilience. Engineering teams must design cost-effective solutions to upgrade aging systems while maintaining operational reliability.
The Impact
Failing infrastructure can lead to costly outages, environmental hazards, and public safety risks. Engineering teams need robust tools to manage complex modernization projects with precision.
How Jama Software Helps
Jama Software – and our innovative solution, Jama Connect – empowers teams with real-time requirements management and traceability to:
Define clear modernization goals and align stakeholders.
Track progress across multi-phase projects, ensuring nothing is overlooked.
Mitigate risks through live traceability and impact analysis. 4. Document decisions for future audits and maintenance efforts.
2: Regulatory Compliance
The Challenge
Adhering to evolving safety, emissions, and sustainability regulations is a constant hurdle for energy storage developers. Regional and global standards demand rigorous documentation, traceability, and audit readiness.
The Impact
Failure to comply with regulatory standards can result in hefty fines, project delays, or operational shutdowns. Development teams need systems to ensure every design and process meets regulatory requirements.
How Jama Software Helps
Jama Connect provides comprehensive traceability and compliance management to:
Simplify regulatory adherence with pre-configured templates for industry standards.
Ensure complete traceability of requirements, tests, and results.
Streamline audits with real-time reporting and centralized documentation.
Foster cross-team collaboration to address regulatory challenges efficiently.
Improving efficiency across production, transmission, and consumption is critical to reducing waste and operational costs. Engineers are increasingly leveraging AI, IoT, and advanced analytics to optimize energy systems.
The Impact
Inefficient systems contribute to unnecessary costs and environmental degradation. Teams must integrate advanced technologies into their designs while managing complex requirements.
How Jama Software Helps
Jama Connect enables innovation through structured requirements management, allowing teams to:
Collaborate on defining requirements for AI, IoT, and analytics integration.
Validate designs against efficiency goals with built-in verification tools.
Identify risks early through impact analysis and proactive testing.
Drive continuous improvement with real-time insights and data integration.
5. Cost and Investment Pressures
The Challenge
Energy storage projects often face high upfront costs and long development timelines. Engineering teams are under pressure to deliver innovative solutions that offer faster returns on investment.
The Impact
Cost overruns and delayed timelines can jeopardize project success and stakeholder confidence. Efficient project management is crucial to meeting deadlines and budgets.
How Jama Software Helps
Jama Connect streamlines project delivery and cost management by:
Enabling real-time collaboration to reduce delays and inefficiencies.
Providing live traceability to track changes and manage scope creep.
Supporting iterative design and development for faster prototyping.
Enhancing decision-making with data-driven insights and reporting tools.
Expert Perspectives: A Conversation with the Originator of UL 4600 on Safety, Security, and Autonomy in Automotive Development
Welcome to our Expert Perspectives Series, where we showcase insights from leading experts in complex product, systems, and software development. Covering industries from medical devices to aerospace and defense, we feature thought leaders who are shaping the future of their fields.
Kenzie Ingram: Welcome to our Expert Perspective series, where we showcase insights from leading experts in complex product systems and software development. Covering industries from medical devices to aerospace and defense, we feature thought leaders who are shaping the future of their fields. I’m Kenzie Ingram, your host, and today I’m excited to welcome Philip Koopman and Neil Stroud to our series.
Philip Koopman is a leading expert in embedded systems and autonomous vehicle safety, with a career spanning critical systems, embedded control networks, distributed embedded systems, and software safety. Neil Stroud is Jama Software’s own General Manager of Automotive and Semiconductor. He brings over 30 years of experience to the conversation, with the last 17 as an industry leader in the functional safety domain. Without further ado, I’d like to welcome Philip and Neil.
Neil Stroud: Hi everyone. I’m Neil Stroud, General Manager of our Automotive and Semiconductor business here at Jama Software. I’m honored today to be joined by Professor Philip Koopman. Phil, I’m going to hand over to you to do the introduction because you will do a way better job of it than I will.
Philip Koopman: Hi, I’m Phil Koopman and I’ve been doing self-driving car safety and embedded systems for a really long time. Self-driving car safety, like not quite 30 years, but we’re getting pretty close, and embedded systems for even longer. I’m a professor at Carnegie Mellon University, although I’m currently sort of finishing up that job. By the time this airs, I’ll be on my last sabbatical on my way to retirement from the university. That doesn’t mean I’m going to sit on the beach the rest of my life. It’s time for a personal pivot. And at Carnegie Mellon, I’ve been teaching embedded systems and doing a lot of work on automotive safety, software safety, but also a whole bunch of other different application domains. Just too many to list all over the place. So that’s kind of what I do for a living right now.
Stroud: Excellent. Thank you. And I’m really looking forward to this conversation. We’re going to go in many different directions and we’re going to talk about safety and autonomous vehicles and all kinds of things. Many folks will know you of course, as a very influential and critical voice around the world of autonomy and safety.
Koopman: I prefer not critical so much as advocating safety.
Stroud: Well, okay.
Koopman: If I’m critical, well, I’m just advocating safety. If people have a contrary view, you can decide what you think about that.
Stroud: Indeed, indeed. But before we get there, I’m interested to learn how you kind of got into all of this because if I think about it, I’ve been doing functional safety for 20 years, and I had no plans at all, it wasn’t even on my radar to get into this industry. I tripped and fell into it. It served me very well. So I’m interested to hear a little bit more about your story. How did you get here?
Koopman: To a degree, I tripped and fell into it too, but we have enough time, the longer story, it’s a really long story in details, but the longer story is back in high school I was in an organization called 4-H, which is for farm kids, and we had a farm, we had cows, but I lived in a city school district. So it’s sort of an interesting setup. And as part of it, for those from the US who are familiar with Boy Scouts, and I’m sure there’s a UK analog, there’s a thing called an Eagle Scout, which is sort of the pinnacle. Well, there’s a comparable thing in 4-H, a very parallel thing, although I point out 4-H is co-ed, and there’s some advantages to that, especially when you’re in high school and a teenager. But my thing thing was bicycle safety, it turned out.
And so I taught hundreds and hundreds of kids basic bicycle safety, which was sort of interesting. Now, I wasn’t planning on making a career of it. That’s just sort of part of how I fell into it. That was the angle that would get me to the end goal. So that was fine. That worked fine for me. Then I drove submarines for a living, and I wasn’t really the safety officer, but, well, actually I was the electrical safety officer, but that’s sort of like an incidental job. It’s more like if you’re going to sleep a couple dozen meters from a nuclear reactor every night, and there are other sources of nuclear radiation, which shall not be spoken of also around, you sort of take safety seriously. Oh yeah, and there’s this several-inch-thick steel hole, and if there’s a hole in it, all the water comes into the people tank, and that’s really bad for the people.
So safety’s kind of on your mind. It’s an extremely hazardous environment. And then I got the Navy, got a PhD, and eventually ended up at United Technologies, which has a bunch of embedded applications. Back then, they had not yet, right now, they sort of specialized, but back then they owned everything from elevators to car equipment to radars and sonars and jet engines and all sorts of stuff. And I did air conditioners and I did elevators. I touched a lot, everything, but I also did some automotive back then. Oh, yeah. Along the way, I was a chip designer of an automotive CPU, so I picked up some automotive experience there. And then I ended up at Carnegie Mellon University. So I was a chip designer. I did embedded applications at Carnegie Mellon and I was doing software robustness because DARPA gave us some funding for software robustness, which is kind of cool.
Koopman: It’s not really safety, but it’s reliability, dependability. Then, Carnegie Mellon ran a car across the US for a couple of 3,000 miles, 98% hands off the wheel. Self-steering car. They just used regular cruise control, but it was on a highway, so that was fine. But it was doing optical flow. I think it was a very primitive neural network, but it wasn’t neural networks like we know them today. It was basically an optical flow algorithm following the lines. And if there were no lines, it would follow the scratches in the pavement or the oil drips or the tire wear or whatever. And it was remarkably good. And if it’s raining, the pavement wear puts lines into the rain. It just figured it out. 98%. That last 2% was mostly off-ramps that have better lines than the road because they’re not as worn. So it loved to take off-ramps. And when it went underneath an overpass in bright sunlight, the auto contrast adaptation freaked out, and it just said, “I don’t know what’s going on,” because the camera flaked out.
And that was mostly the 2%. Because it’s interstate highways, it’s just not a lot going on for a single car making a single trip. And ever since, they’ve been working on that last 2% still today. But after that, there was a bigger thing called the Automated Highway Systems. And there was a consortium not run by NHTSA, run by Federal Highways to automate the highways. And Carnegie Mellon put a couple of city buses on a highway with that kind of technology and some of their cars driving around again, 98% %-ish. And they’re like, maybe safety should be a thing. And they had some funding, and I needed some funding, so I became their safety guy because I knew something about reliability, dependability. And that was in the mid-nineties.
That’s how I got into self-driving car safety. It’s like right place, right time, right opportunity. Back in the NavLog crew. And now this is, we’re talking 10 years before any of the grand challenge stuff happened. This completely separate effort way before grand Challenge. And there are a few of us, like one or two or three. No, there are at least two. I know at least one of them, there may be a third, who were doing safety back then, and that was about it. Right? There are not a lot. And so I got into self-driving car safety then, and it’s come and gone. And I’ve done a ton of other embedded things, hundreds of design reviews not on cars, but safety always just keeps popping up. Doing a design review on a flow control valve for a chemical plant. It kind of matters, right? Things go boom if that messes up.
So I’ve touched a whole bunch of safety standards, but it’s turned out that once self-driving cars got hot, well, there I was back into self-driving car safety.
Ensure your space systems meet industry standards with ease.
The European Cooperation for Space Standardization (ECSS) provides a unified set of standards to streamline space system development and promote interoperability among international agencies. Our customers are leveraging Jama Connect® to comply with ECSS standards, resulting in enhanced collaboration, reduced risk, and mission success in the aerospace industry.
With Jama Connect, you can seamlessly manage these standards while maintaining full traceability and ensuring compliance throughout your projects.
Join us for this engaging webinar with Jama Software® experts Cary Bryczek – Director of Aerospace & Defense (A&D) Solutions and Martijn Janssen – Senior Solutions Consultant, provide a high-level overview of the ECSS standards, along with best practices for leveraging them within Jama Connect, including:
ECSS Process workflows and how they align with processes managed within Jama Connect
Establishing a ECSS Library in Jama Connect to provide a single–source of truth
Explanation on how to tailor the ECSS requirements and leverage Jama Connect’s Reuse capability
Don’t miss the chance to unlock new efficiencies in your systems engineering processes and ensure your projects stay on track.
Below is an abbreviated transcript of our webinar.
I am Cary, the Director of Aerospace and Defense Solutions. I lead up a global team of industry and Jama Connect experts. For today’s webinar, first to speak is Martijn Janssen.
Martijn is a senior consultant at Jama Software. He has been working with PLM and requirements management solutions for over 15 years and is very proficient in not only Jama Connect, but the Siemens Industry Software solutions, as well as PTC Windchill. He currently works on implementing space-related systems such as satellites, launchers, and space-related components in the European Union for our Jama Connect partners. Martijn is a specialist in both systems engineering and information technologies. With that, I’ll pass it over to you, Martijn.
Martijn Janssen: Well, thank you for the introduction there, Cary. So, welcome everybody to our webinar on ECSS. I’m very excited today to introduce you to the way we manage ECSS standards within Jama Connect. Over the past couple of years, we’ve been working with a lot of customers on managing ECSS standards within our solutions, and today, we’re going to show you some examples on how we manage to do that. So, without further ado, I’m going to go over some of the ECSS standards, what it includes, what the use cases our customers face, and then afterwards, we’ll dive into the system and show you some of those use cases in action in Jama Connect. Let’s dive in to the presentation.
When we talk about ECSS, I presume many of you here already are aware, but for those of you that are not aware of ECSS, ECSS is a European corporation and it’s a collaboration between the ESA, the European Space Agency and many different other space agencies across the world to make sure that we have a single set of standards that we can use across companies working in the European space activities. Many of our customers around the world are looking to those standards, making sure they are compliant to them and working with those standards in different projects and at different levels. So, ECSS is a standard. You can find a lot of information on the website or ESA around the standards. They’re all there to be found if you’re not aware of them already.
The way that ECSS is organized and set up is something you will see in the standards on the website itself, but we also have the organization within our Jama Connect application. So, when we talk about the standards, the standards are divided into branches and disciplines. So, you will find, for example, the different branches on the top level there. So, for example, the space project management branch or the engineering branch, and below those branches, you will find a lot of disciplines detailed out per section and they are numbered in a specific way. Again, when we look into the demo, you will see a lot of those specific annotations come back and we maintain that same structure within Jama Connect.
Janssen: So many of our customers use a subset or a number of these standards in their Jama Connect application to make sure they are compliant and they are working towards the standards that ESA has set for these specific projects. So, the main structure in here is recognizable towards what is on the website and in the organization of ECSS. Outside of the actual organization of the disciplines and the branches, the disciplines themselves are even further, let’s say, detailed in documents and all these documents fall into one of those disciplines. So, for example, when we look at the discipline system engineering, you can see a large number of documents below that talking about different topics.
So, for example, on testing, on verification, on referencing, coordinate systems, all kinds of documents describing the standard, what you need to do to be compliant towards those standards. Now these documents are pulled into Jama Connect, and as you will see later on, we have all these documents available for you to start tracking and tracing compliance. So, the structure from a branch to a discipline to all the documents is something that you will recognize in the demo later on and where you can find and filter and search for certain topics that are numbered and maintained by the ESA. All right. So, that’s a little bit of a background behind the ECSS organizational diagram.
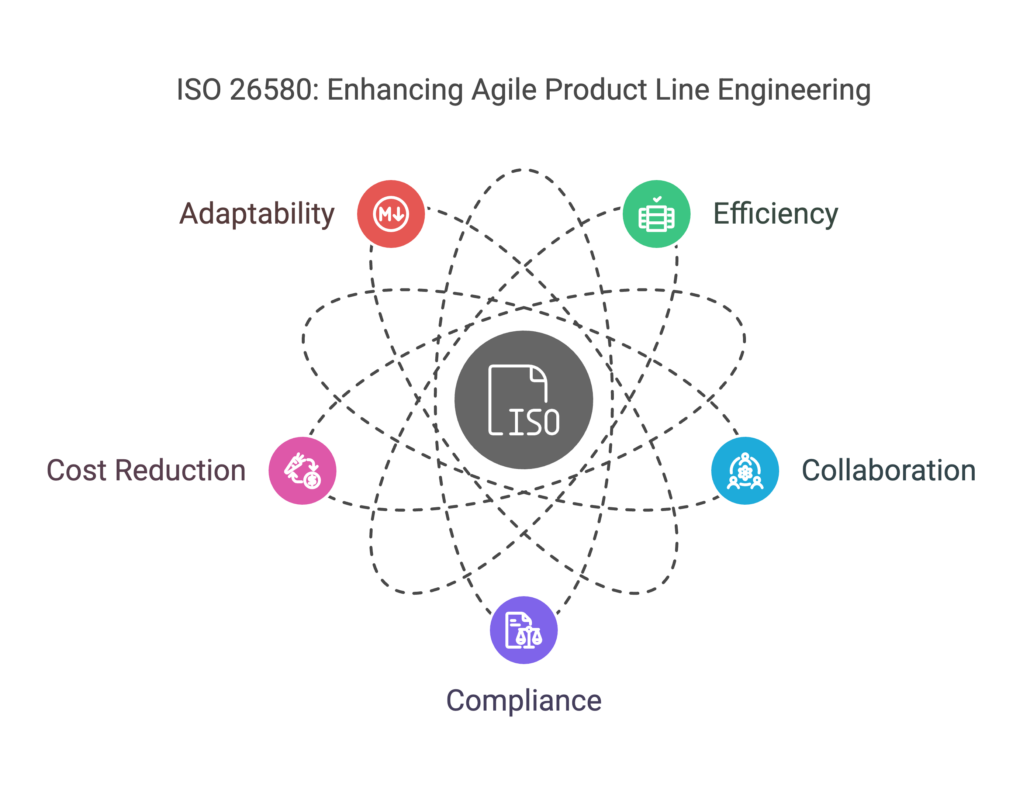
Understanding ISO 26580: The Standard for Agile Product Line Engineering
Modern organizations face the challenge of balancing speed, compliance, and innovation, particularly when managing complex systems across multiple product lines. ISO 26580 provides a structured approach to addressing these challenges by standardizing Agile Product Line Engineering (APLE). But what exactly is ISO 26580, and why is it important? Let’s break it down.
ISO 26580 is an international standard that defines best practices for Agile Product Line Engineering (APLE). It bridges the gap between Agile methodologies and Product Line Engineering (PLE), enabling organizations to efficiently develop and manage product variations while maintaining agility in development processes.
The standard provides guidance on:
Integrating Agile principles with PLE frameworks
Managing shared assets across multiple product variations
Streamlining development cycles without sacrificing quality
Ensuring regulatory compliance within Agile environments
As industries shift towards mass customization and digital transformation, companies need robust strategies to manage evolving product lines efficiently. ISO 26580 helps businesses achieve this by:
Enhancing Efficiency: Organizations can reuse core components across product variations, reducing duplication and accelerating time-to-market.
Improving Collaboration: By integrating Agile methodologies, teams across different domains can collaborate more effectively, reducing silos.
Ensuring Compliance: Many industries, such as automotive and aerospace, require rigorous compliance. ISO 26580 helps align Agile processes with industry regulations.
Reducing Costs: With a structured approach to managing product variations, organizations can significantly cut development costs and resource expenditures.
Increasing Adaptability: Agile PLE enables companies to quickly adapt to market changes and customer demands without overhauling entire systems.
Who Benefits from ISO 26580?
Industries that manage complex systems with multiple variations, such as:
Automotive (e.g., different models of electric vehicles with shared software platforms)
ISO 26580 is a game-changer for organizations balancing innovation, compliance, and efficiency in Agile product development. By standardizing Agile Product Line Engineering, it empowers businesses to streamline processes, improve collaboration, and accelerate market responsiveness. For companies navigating complex product variations, adopting ISO 26580 isn’t just an advantage — it’s a necessity.
Note: This article was drafted with the aid of AI. Additional content, edits for accuracy, and industry expertise by Matt Mickle, McKenzie Jonsson, Mario Maldari, and Decoteau Wilkerson.
Traceable MBSE™ in Action: Integrating Sparx Enterprise Architect with Jama Connect®
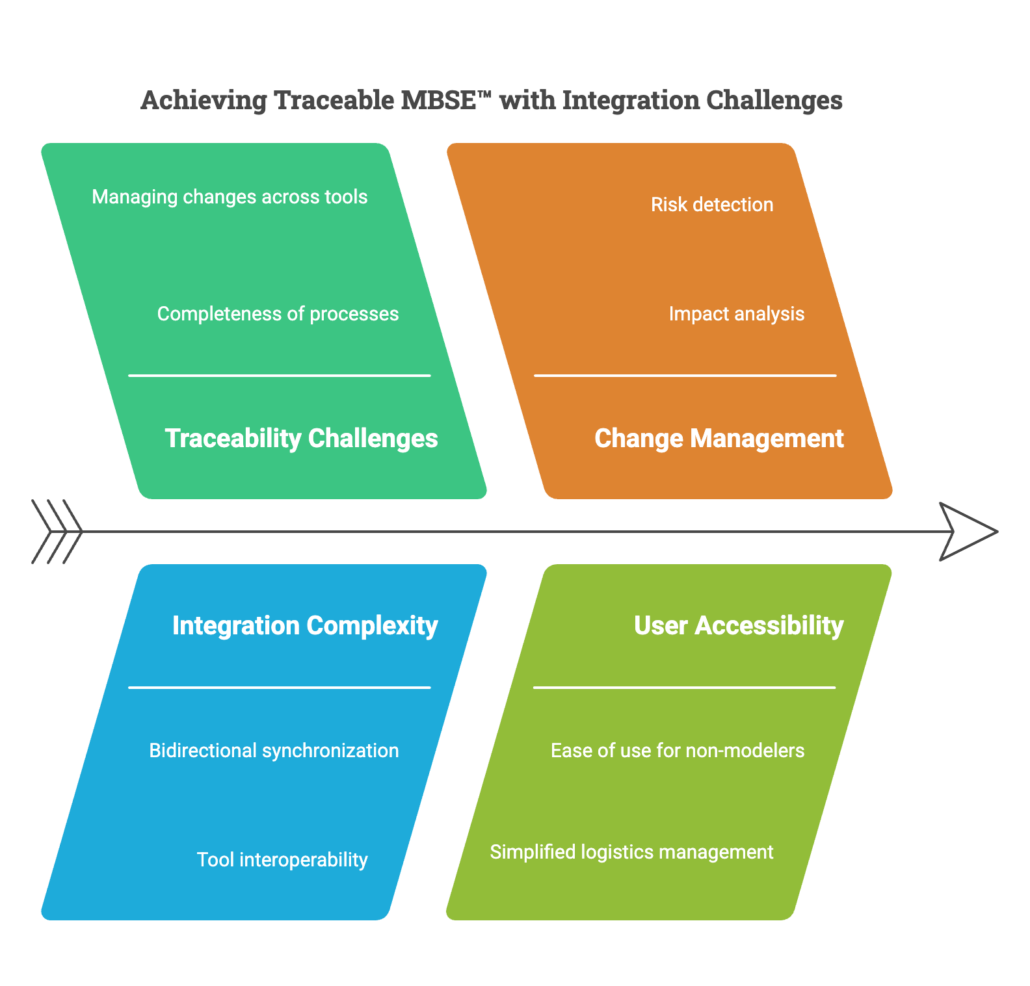
In the complex systems engineering landscape, maintaining Model-Based Systems Engineering (MBSE) across requirements and architecture is a major challenge. Engineers must ensure that high-level requirements flow seamlessly into architectural elements while managing changes across multiple tools.
With the integration between Sparx Enterprise Architect and Jama Connect®, teams can achieve Traceable MBSE™ with bidirectional synchronization of requirements, architecture elements, and diagrams. This enables a holistic view of system design, ensuring real-time traceability, impact analysis, and compliance with predefined processes.
In this blog, Atef Ghribi, Senior Solutions Architect at Jama Software, demonstrates the Sparx Enterprise Architecture integration with Jama Connect.
TRANSCRIPT
Atef Ghribi: Hello. My name is Atef Ghribi, and I’m a Senior Solutions Architect at Jama Software. Today, we will be walking through the Sparx Enterprise Architect integration. But before looking at the tools in action, let’s explore the goal we are trying to achieve as well as the following approach.
Some of the major questions that systems engineers are faced with are related to traceability and how to ensure its completeness based on predefined processes, methodologies, and rules. Making sure that there are no gaps in the process and that all the needs and high-level requirements are covered and satisfied by the lower-level requirements as well as architectural elements, and figuring out how to overcome the challenges of managing changes across the traceability chain, which in most of the cases spans over and across multiple tools. Applying that to the architecture context results in questions like, how do architecture changes impact requirements and vice versa?
As MBSE leaders and advocates, the question is how to make sure that MBSE is accessible and usable easily and efficiently to non-modelers without the need to take care of all the logistics and know what the architecture tools require. With integrations to architecture tools, including Enterprise Architect, Jama Connect enables its users to leverage traceable MBSE to work and interact with the architecture providing a holistic overview of the whole systems engineering process.
Traceable MBSE is a technical approach for the creation, consumption, and measurement of systems engineering data with Jama Connect frameworks for achieving Live Traceability™. The way it works is by enabling bidirectional synchronization of requirements and architecture elements between Jama Connect and Enterprise Architect, as well as syncing diagrams and traceability from Enterprise Architect to Jama Connect as the central engineering management repository.
Jama Connect uses the data to enable intelligent engineering management, providing the ability to detect process risks and identify gaps, measure progress and coverage, and analyze the impact of changes. What we will see in the integration is a simple flow between requirements and architecture elements, starting by creating requirements within Jama Connect and transitioning to Enterprise Architect to start using those requirements in the architecture, where we will be creating architectural elements like blocks, allocating the new requirements to them by creating dependency traces. And that’s all we will need to do as users. The integration will then take care of syncing those changes from the architecture back to our central engineering data repository, Jama Connect. Let’s see this in action.
Ghribi: What we see right now in front of us is the Jama Connect project that we are using for the integration, governed by this process or the so-called relationship rule diagram, where we can see the relationship rules that are defined and expected for this project. This will be the instrument that helps us measure the progress and coverage and identify the gaps later. What is interesting for us in the context of this integration are the two item types, system requirements, and architectural elements, as well as the relationship between them that enables users to allocate system requirements to architectural elements.
If we look at the left-hand side of the screen, we can see our project tree, which is the place where we store the content of our project. And we can there also find the system requirements that are managed within this project. So here as a system requirements engineer, I’m gonna be able to create a new system requirement that will be synchronized based on the integration to our Enterprise Architect. So keeping things simple, I’m gonna call this new system requirements.
We can select a type, and we can give it some text as a description. Let’s say description text. And we can save this one to our Jama Connect database.
The integration works now in the background to ensure a real-time synchronization of these changes into our respective EA project. If we also look at another location inside of our project, we can see the place where we defined the integration to sync our architectural elements. Both the diagrams as well as the architectural elements will be synchronized here. We will get back to this later to see how we change or how the changes that we’re gonna do in Enterprise Architect will be updated here.
Let’s switch now to Enterprise Architect and explore the project structure and see if we can find that new system requirement that we just created in Jama Connect. We are keeping the structure of this project simple. And for the sake of simplicity also, as you can see inside of the folder of requirements, we just have a plain list of our system requirements without any folders or any informational elements.
And as we can see, we can find the new system requirement that we just created listed here. So as an architect, I can now use that new input and go to my architecture and create a new architectural element. Save and close. That should create our new item in the Explorer for the project. Now we can start using that new element in our diagram, and you will be able to just place it inside of the diagram and link it. We can do the same for our requirement to create the traceability and allocate that requirement that we just got into the new architectural elements.
And just by creating the relationship as a dependency, we can make sure that now we have the traceability from our system requirements into our architectural element. We can now save the changes in this diagram. As an additional step, I will go to our requirements and start making some changes just to synchronize back and see how the description will change if we just add some changes from EA. Saving. And now we can go back to Jama Connect and explore the changes there.
Ghribi: Now as we go back to Jama Connect, we can explore our architecture again and see if we can see that new system architectural element. Just need to refresh first our trajectory. And now we can see that new element that was just created inside of our Jama Connect database. Now I can also take a look at the diagrams and see that internal block diagram that just got updated by the integration. In addition to these updates inside of my Jama, I can see also the changes that were applied to my requirement. I can start seeing the changes, that were just, synchronized. I can also start comparing, and understanding what exact changes were now made and modified between the different versions of my requirement.
In addition to that, the traceability that we just created inside of Enterprise Architect can also be seen here. If I go and open the live trace view inside of Jama Connect and scroll up to see how my architectural elements are synchronized and traced to system requirements, I can see the relationship between the new system requirements and the architectural element that was created inside of Enterprise Architect, also inside of charmer.
What we can also see in this view are all the gaps related to all the architectural elements that do not have any system requirements allocation. We can see the same information from the system requirements perspective, this time covering more system requirements. So if we just narrow down our trace view to our system requirements on the left-hand side of the screen and to our architectural elements on the right-hand side of the screen, we can start also seeing all those other system requirements that do not have any coverage or allocation into architectural elements based on the predefined process assigned to this project. We can see the same information also in our dashboard.
So if we use filters and widgets, we can simply see that information in real time and be able to capture any gaps in the process before it’s too late. Now Jama Connect helps us also to get a holistic overview of our project just by using the Live Trace Explorer™ I can just expand here on my project and open a full coverage view that compares the project or the state of my project to the process assigned to it and defines and shows a trace score in real time where I can focus on the exact KPIs and metrics that are relevant for me. For our case today, the architectural elements cover our system requirements where we can trust the progress and see the covered percentage in real time.
As soon as anything changes within Jama Connect or in Enterprise Architect, these values will be updated in real-time, and we can keep track of the progress. Thank you for watching this session on the Enterprise Architect integration for Jama Connect. If you are an existing customer and want to learn more, please reach out to your customer success manager or consultant.
If you would like to learn more about how Jama Connect can optimize your product development process, please visit our website at jamasoftware.com. If you are already a Jama Connect customer and would like more information about release management via reuse and synchronization, please contact your Customer Success Manager or Jama Software Consultant.
The New ARP4754B and Techniques in Jama Connect® for Airborne Systems
ARP4754B, released on December 20, 2023, is a standard from SAE International that provides recommendations for the development of civil aircraft and systems, focusing on ensuring safety and compliance with regulations. It covers the entire aircraft development cycle, from system requirements through verification and validation. The latest revision includes new methods for safety analysis, such as Model-Based Safety Analysis (MBSA) and Cascading Effects Analysis (CEA). It is mandatory for all aircraft and systems worldwide, including emerging eVTOLs and UAVs, to demonstrate compliance with aviation regulations. This guideline aligns with ARP4761A, which was released on the same date, for safety assessment processes and offers increased flexibility in selecting validation and verification methods.
ARP4754B Applied in Jama Connect for Airborne Systems
ARP4754B and ARP4761A are both crucial guidelines, and the alignment between the two new versions has been enhanced to streamline development and safety assessments. In addition to the inclusion of the two new safety analysis methods, ARP4754B now places a stronger emphasis on identifying and mitigating unintended behaviors. It now includes consensus methods for demonstrating compliance within the development planning process and has also enhanced its flexibility in validation and verification.
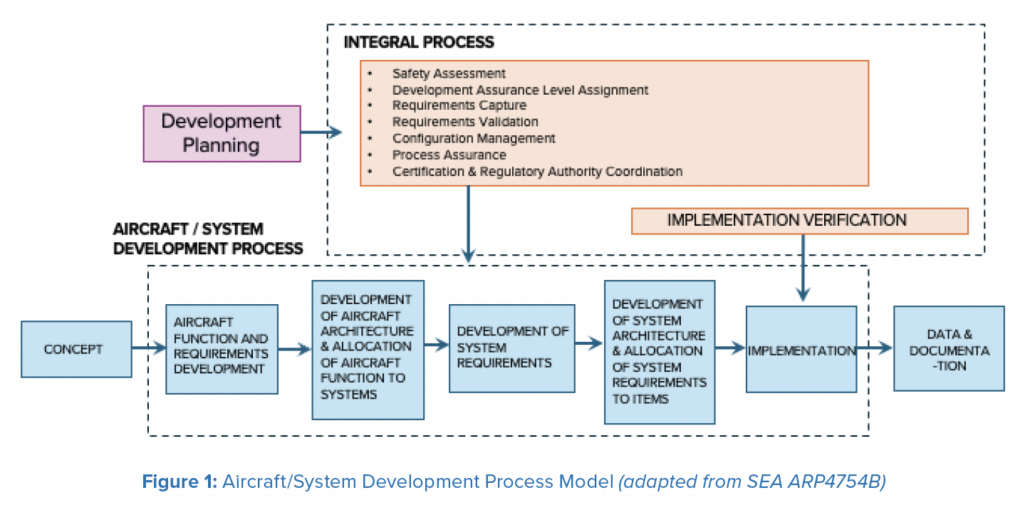
Jama Connect can be used throughout the system development process as the primary system to manage the requirements and full product traceability. Figure 1 from ARP4754B outlines the relationships between the lifecycle and integral processes, which provide guidelines for safety assessment, electronic hardware and software lifecycle processes, and the system development process described herein.
There are always numerous ways to tailor the use of Jama Connect. Here’s how the updates to ARP4754B influence requirements management and how our Airborne solution is pre-configured to support them.
1: Adoption of Model-Based Systems Engineering (MBSE)
MBSE Integration: Updates encourage the use of MBSE to handle the increasing complexity of aircraft systems.
Modeling Languages: Use of modeling languages like SysML to create detailed system models that include requirements, behavior, and structure.
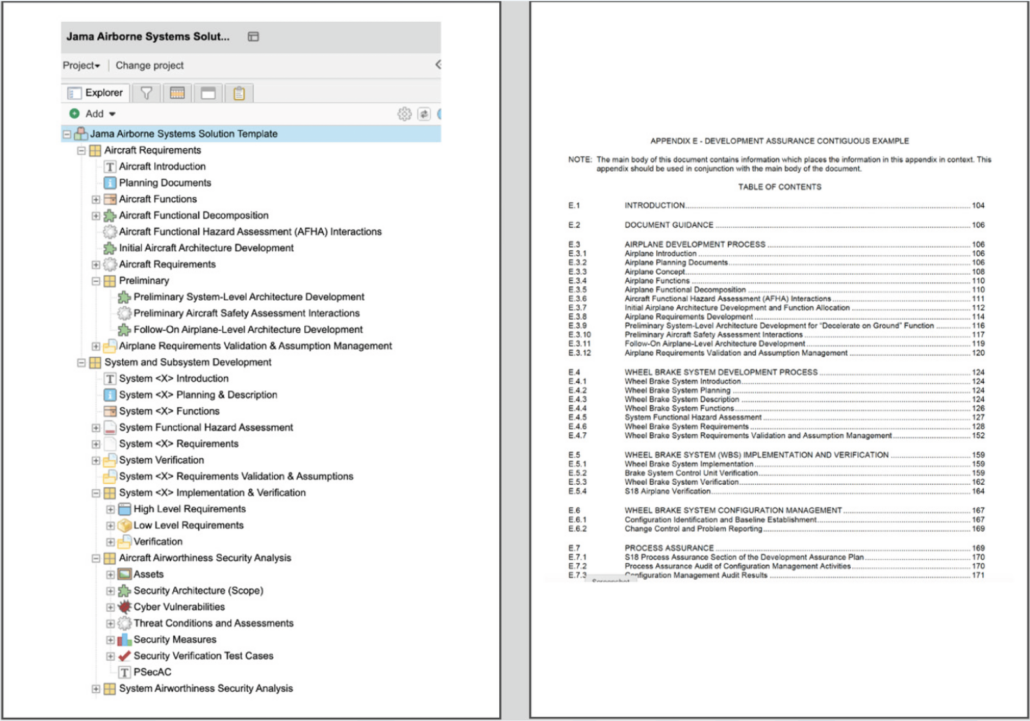
Jama Connect for Airborne Systems Model-Based Techniques
Model-Driven Requirements: Requirements are captured and managed within the Jama Connect data model, providing requirements management techniques that support model-based representations. The Solution comes pre-configured with element types that correspond to the levels of requirements called out in ARP4754B, function elements, WBS, verifications and validations, and safety-related elements. Jama Connect constrains the data to follow the traceability rules which enable rapid analysis, automated trace matrix generation, and querying and reporting.
Synchronization of Models and Textual Requirements: Ensuring consistency between textual requirements and model-based representations requires synchronization mechanisms. Jama Connect is often used in conjunction with SysML tools and all leading vendors offer native integrations.
Figure 2: Model-based elements replace documents and the Jama Connect for Airborne Systems’ traceability schema maintains consistency.
2. Enhanced Integration of Safety and Requirements Management
Safety-Driven Requirements: The updates emphasize integrating safety assessments directly into the requirements management process. This means that safety considerations become a foundational aspect of requirement definition and management.
Iterative Feedback Loop: There is a stronger focus on creating an iterative process where safety analysis results inform requirement updates, and changes in requirements trigger reassessment of safety analyses.
Jama Connect for Airborne Systems Safety & Requirements Management Techniques:
Traceable Within the Model: The outputs from safety analyses are captured and managed directly in Jama Connect. Our Airborne Systems solution provides the data model for a consistent trace and data strategy between safety, requirements, and tests.
Requirements Annotation: Requirements have built-in attributes for safety-related information, such as hazard classifications and safety integrity levels.
Tool Integration: Jama Connect integrates seamlessly with safety analysis tools such as ANSYS Medini, the LDRA tool suite and others to ensure seamless data flow and traceability between safety assessments and requirements.
Figure 3: Jama Connect for Airborne Systems solution on the left and SAE ARP4754B (page 102) on the right.
Bidirectional Traceability: Enhanced emphasis on maintaining bidirectional traceability between requirements, design artifacts, implementation, and verification activities.
Traceability to Safety Objectives: Requirements must be directly linked to safety objectives and hazard analyses derived from updated safety assessment processes.
Jama Connect for Airborne Systems Solution Techniques:
Robust Traceability Matrices: The solution comes preconfigured with views and filters required by ARP4754B. These sophisticated traceability matrices that map requirements to design elements, test cases, and safety analyses are also exportable. The Airborne Systems solution has out-of-the-box export templates that can also be tailored.
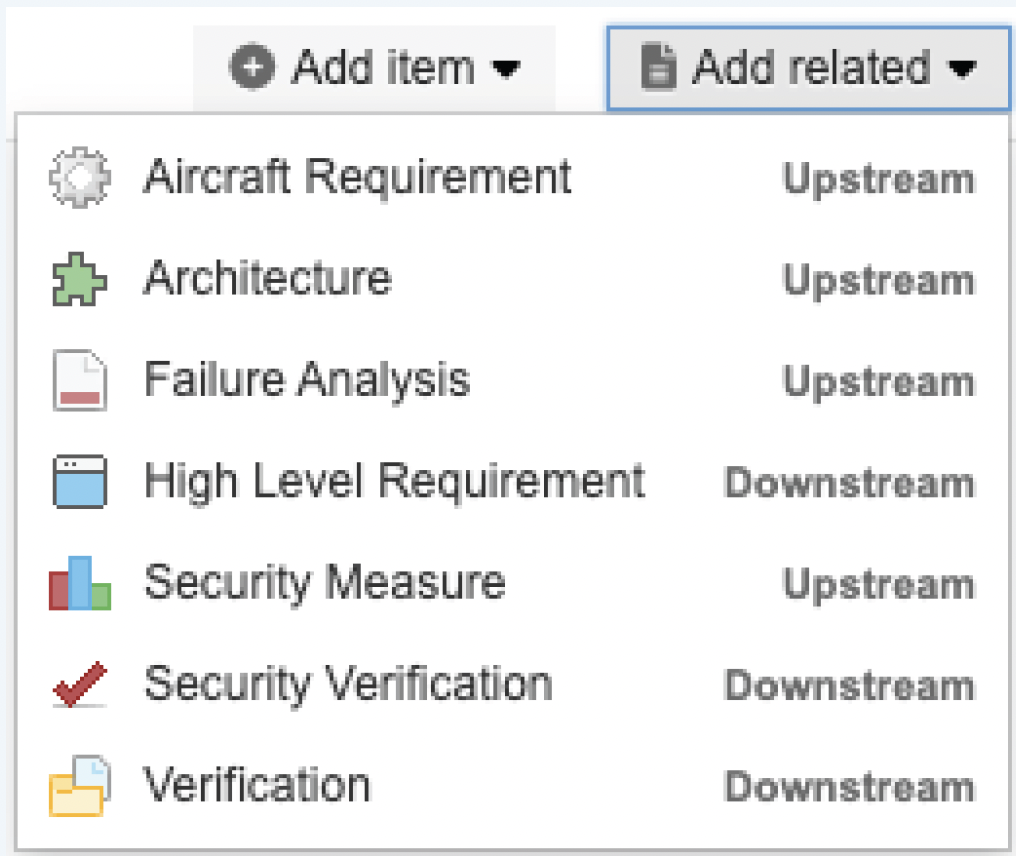
Automated Traceability: Instead of authoring content and then creating a trace to its related content after the fact, use the “Add Related” functionality built into Jama Connect. This use of automated trace creation to manage traceability reduces the risk of human error and improves efficiency.
Figure 4: Constrained set of data choices ensures users create consistent traces.
We’ve shared 3 of the 6 ways Jama Connect’s Airborne Solution supports ARP4754B influence requirements management.
Want the full picture? Download the whitepaper to explore them all!
Understanding ISO 13849: The Foundation of Functional Safety in the Machinery Sector
Like many industries, functional safety is a critical part of machinery design – ensuring the protection of operators, equipment (and surrounding environments) from hazardous situations. To help maintain functional safety in industrial manufacturing, most organizations use ISO 13849, a globally recognized standard that provides comprehensive guidelines for achieving and validating functional safety in machinery control systems. In this blog, we’ll look at the importance of ISO 13849, key components, and how it shapes functional safety in the machinery sector.
According to an informal ISO/TC stakeholder survey, more than 89% of machine builders and more than 90% of component manufacturers and service providers use ISO 13849 as their functional safety standard.
What is ISO 13849?
Officially titled “Safety of machinery – Safety-related parts of control systems”, ISO 13849 is an official standard that outlines the principles for designing and assessing the safety-related parts of control systems (SRP/CS). These are systems that directly influence the safety functions of a machine, e.g., emergency stops, interlocks, and protective barriers.
ISO 13849-1: Focuses on general principles for design and performance.
ISO 13849-2: Covers validation procedures for ensuring the compliance of safety functions.
By following this standard, manufacturers can reduce the likelihood of machinery-related accidents and improve overall safety compliance.
Why is ISO 13849 Essential in the Machinery Industry?
Is it mandatory? Well, no.
However, the machinery sector operates in environments where equipment malfunctions can lead to severe injuries, fatalities, and property damage. Functional safety – as defined by ISO 13849 – helps mitigate these risks by emphasizing:
Reducing Risk: Identifying potential hazards and designing systems to minimize them.
Reliability: Ensuring that safety-related control systems perform their intended functions under all expected conditions.
It’s also important to note that compliance with this standard can also help teams avoid legal and financial repercussions if something does go wrong.
ISO 13849 bridges the gap between innovation and safety, enabling manufacturers to integrate cutting-edge technology without compromising operator protection.
Key Info about ISO 13849
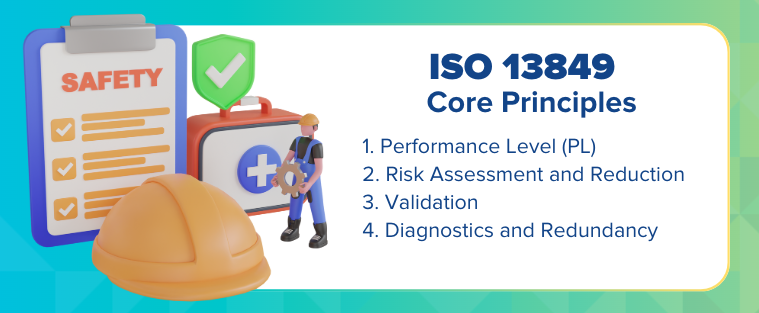
ISO 13849 revolves around several core principles:
1: Performance Level (PL) – Performance Level quantifies the reliability of safety functions, categorized from PL a (lowest) to PL e (highest). Factors influencing PL include:
Hardware structure.
Diagnostic coverage (DC).
Mean time to dangerous failure (MTTFd).
Common cause failure (CCF) protection.
2. Risk Assessment and Reduction – Part of this standard is the emphasis on conducting thorough risk assessments to identify potential hazards and determine the necessary PL for mitigation.
3. Validation – Validation ensures that the implemented safety functions meet design specs and operate correctly under foreseeable conditions. ISO 13849-2 provides specific procedures for this step.
4. Diagnostics and Redundancy – Built-in diagnostics and redundant systems enhance reliability, preventing failures from leading to unsafe conditions.
Implementing in Functional Safety Design
Successfully implementing ISO 13849 needs a structured approach:
Risk Assessment: Analyze the machinery’s operational scenarios to identify risks.
Determine Safety Requirements: Define safety functions and their corresponding Performance Levels.
Design Safety Systems: Develop control systems with redundancy, diagnostic coverage, and robust design principles.
Validation: Test and validate by comparing to ISO 13849-2 to make sure you’re compliant.
Benefits of Choosing to Comply
Adhering to ISO 13849 delivers a lot of advantages for machinery manufacturers and operators:
Enhanced Safety: Reduces the risk of accidents and improves operator confidence.
Regulatory Compliance: You’ll meet international safety standards, facilitating market entry and reducing liability.
Cost Efficiency: Minimizes downtime and damage from malfunctions.
Reputation Management: Demonstrates a commitment to safety and reliability, boosting brand credibility.
Implementing ISO 13849 can be challenging, especially for manufacturers unfamiliar with its requirements. Some common obstacles could be:
Complexity in Risk Assessment: Accurately determining Performance Levels requires expertise.
Integration with Legacy Systems: Retrofitting older machines can be resource intensive.
Validation Procedures: Comprehensive testing can be time-consuming.
Some thoughts on overcoming these challenges:
Engage Experts: Don’t go it alone – collaborate with functional safety specialists.
Use Certified Components: Choose components that meet ISO 13849 requirements.
Invest in Training: Help your team succeed! Equip them with the knowledge to apply the standard effectively.
ISO 13849 serves as a cornerstone of functional safety in the machinery sector. By following its guidelines, manufacturers can design systems that not only meet regulatory standards but also provide robust protection against operational risks. In an industry where safety is paramount, ISO 13849 ensures that innovation and reliability go hand in hand.
Note: This article was drafted with the aid of AI. Additional content, edits for accuracy, and industry expertise by Steven Meadow and McKenzie Jonsson.