As organizations grow, the complexity of their projects multiplies. Managing tens of millions of requirements and thousands of simultaneous users can strain legacy systems that persist in the market. For large enterprises, a requirements management platform must do more than just store information; it must scale effortlessly, perform reliably under pressure, and provide clear, comprehensive insights. Jama Connect is engineered specifically to meet these enterprise-level challenges, ensuring that your teams can innovate without being hindered by their tools.
The Enterprise Challenge: Scaling Without Compromise
In a large-scale environment, systems are constantly tested by the sheer volume of data and user activity. A platform might work well for a small team in a startup mode, but how does it perform with 1,000s of users accessing and modifying tens of millions of requirements? The risk of slowdowns, data conflicts, and system instability becomes a major concern. Large enterprises need a solution that guarantees high performance, data integrity, and a seamless user experience, regardless of scale and volume. Users that experience performance issues will often abandon the tool and find other means to complete their work. For a requirements management process, this effectively causes more work, introduces defects, and undermines the value of having a single source of truth. This frequently occurs in legacy requirements management tools with antiquated architecture that do not scale well.
Jama Connect addresses this with an architecture designed for high-volume, high-concurrency environments and dynamic scalability. It allows organizations to manage complex and large product development lifecycles effectively, from initial concept to final launch and beyond, ensuring that every team member is aligned and productive while enjoying a positive user experience.
Supporting Hundreds of Thousands of Users Simultaneously
One of the most significant tests for any enterprise platform is its ability to support a large number of concurrent users without performance degradation. Jama Connect is architected to handle this demand, allowing global teams to collaborate in real time. Whether it’s engineers in one country, testers in another, and project managers in a third, everyone can access and update requirements simultaneously.
This capability is crucial for maintaining project velocity. Delays caused by system lag or user lockouts can create bottlenecks and push timelines back. Jama Connect’s robust infrastructure ensures that as your user base grows, the platform remains responsive and stable. This allows teams to focus on their work, not on waiting for their tools to catch up.
Managing Billions of Requirements with Ease
Modern products, from medical devices to aerospace systems to autonomous driving vehicles, can involve millions of individual requirements, test cases, and risk analyses. Managing this volume of data is a monumental task. Jama Connect is optimized to handle large amounts of requirements and other related assets, allowing enterprises to centralize all their requirements in a single, organized repository.
The platform’s performance isn’t just about storage; it’s about accessibility and usability. Users can quickly search, filter, and analyze millions of items to find the exact information they need. This efficiency is vital for making informed decisions and ensuring that all project components are aligned with top-level goals. For example, the ability to create a detailed requirement traceability matrix or view remains fast and fluid, even with extensive data sets.
The Power of Live Traceability™ at Scale
Traceability is the backbone of compliant and high-quality product development. In an enterprise setting, maintaining this traceability across integrated toolchains can be incredibly complex. As data is created across the V model, the number of requirements grows exponentially, and so do the numbers of traces. Jama Connect simplifies this interoperability. The concept of Live Traceability is to provide a dynamic, real-time view of the relationships across your integrated tool chain. For example, when integrated with a tool like Jira or a modeling tool, it is essential to know when a user story or aspects of the model have been updated and how it impacts requirements in your requirements tool.
As one team member updates a requirement, the impact of that change is instantly visible to everyone else. This immediate feedback loop is essential for impact analysis. Before committing a change, teams can see exactly which downstream items will be affected, preventing unintended consequences and reducing rework. When the requirements tool is integrated with other systems in your toolchain, it is essential that this process be scalable in order to handle the level of change that occurs at enterprise scale, where tens of thousands of requirements and tests can be impacted by upstream change.
For an enterprise, downtime is not an option. Jama Connect is built on a modern, service-oriented architecture that delivers the performance, scalability, and reliability required for mission-critical projects. It is designed to integrate smoothly into existing enterprise IT ecosystems, offering flexible deployment options, whether on-premises or in AWS cloud.
This focus on enterprise-grade performance means that teams can depend on Jama Connect to be available and responsive when they need it most. Performance of the tool is measured “at the glass,” ensuring that the user experience is the main focus. The P75 load time for cloud hosted environments is under 3 seconds. The platform’s advanced architecture is optimized for handling complex queries and large data loads, ensuring that generating reports, conducting reviews, and navigating trace relationships is always a fast and efficient process.
The ultimate definition of scale is that user experience remains consistent regardless of the amount of data in the system. Jama Software’s focus on user-experienced performance proves that while managing billions of requirements, the user experience (measured via P75 load times) remains consistent and well within best practices. No other tool in the industry can make such a claim because no other tool in the industry combines the modern architecture and performance monitoring of Jama Connect.
Conclusion: Scale Your Innovation with Confidence
When shopping for a requirements tool, there are many considerations: features, price, and industry position. One of the main aspects to consider is scalability and growth. If you are serious enough to be seeking out a requirements management tool, you understand the value of formalized requirements to your business and are certainly expecting your business to grow and be successful. Why invest in a tool today that won’t be able to grow with you tomorrow?
For large enterprises, selecting a requirements management platform is a strategic decision that impacts productivity, quality, and time to market. The solution must be able to grow with the organization and handle the complexities of modern product development.
Jama Connect proves itself as a true enterprise-grade platform by delivering exceptional performance, supporting hundreds of thousands of concurrent users, and managing billions of requirements with ease. With Jama Connect, enterprises can scale their operations and ambitions without being limited by their tools, empowering them to build the next generation of innovative products with confidence.
“What I cannot create, I do not understand.”
Richard Feynman
Redux is pretty simple. You have action creators, actions, reducers, and a store. What’s not so simple is figuring out how to put everything together in the best or most “correct” way. In this blog, we begin by explaining the motivation behind using Redux and highlight its benefits, such as predictable state management and improved application performance. It then delves into the core concepts of Redux, including actions, reducers, and the store, providing a step-by-step guide on how to implement Redux in a JavaScript application. We will emphasize the importance of understanding Redux’s underlying principles and showcases code examples to illustrate its usage.
To rewrite Redux, we used a wonderful article by Lin Clark as a reference point, as well as the Redux codebase itself, and of course, the Redux docs.
You may note we’re using traditional pre-ES6 Javascript throughout this article. It’s because everyone who knows Javascript knows pre-ES6 JS, and we want to make sure we don’t lose anyone because of syntax unfamiliarity.
The Store
Redux, as is the same with any data layer, starts with a place to store information. Redux, by definition of the first principle of Redux, is a singular shared data store, described by its documentation as a “Single source of truth”, so we’ll start by making the store a singleton:
var store;

function getInstance() {
 if (!store) store = createStore();
 return store;
}

function createStore() {
 return {};
}

module.exports = getInstance();
The dispatcher
The next principle is that the state of the store can only change in one way: through the dispatching of actions. So let’s go ahead and write a dispatcher.
However, in order to update state in this dispatcher, we’re going to have to have state to begin with, so let’s create a simple object that contains our current state.
function createStore() {
 var currentState = {};
}
Also, to dispatch an action, we need a reducer to dispatch it to. Let’s create a default one for now. A reducer receives the current state and an action and then returns a new version of the state based on what the action dictates:
function createStore() {
 var currentState = {};

 var currentReducer = function(state, action) {
  return state;
 }
}
This is just a default function to keep the app from crashing until we formally assign reducers, so we’re going to go ahead and just return the state as is. Essentially a “noop”.
The store is going to need a way to notify interested parties that an update has been dispatched, so let’s create an array to house subscribers:
function createStore() {
 var currentState = {};

 var currentReducer = function(state, action) {
  return state;
 }

 var subscribers = [];
}
Cool! OK, now we can finally put that dispatcher together. As we said above, actions are handed to reducers along with state, and we get a new state back from the reducer. If we want to retain the original state before the change for comparison purposes, it probably makes sense to temporarily store it.
Since an action is dispatched, we can safely assume the parameter a dispatcher receives is an action.
function createStore() {
 var currentState = {};

 var currentReducer = function(state, action) {
  return state;
 }

 var subscribers = [];

 function dispatch(action) {
  var prevState = currentState;
 }

 return {
  dispatch: dispatch
 };
}
We also have to expose the dispatch function so it can actually be used when the store is imported. Kind of important.
So, we’ve created a reference to the old state. We now have a choice: we could either leave it to reducers to copy the state and return it, or we can do it for them. Since receiving a changed copy of the current state is part of the philosophical basis of Redux, we’re going to go ahead and just hand the reducers a copy to begin with.
function createStore() {
 var currentState = {};

 var currentReducer = function(state, action) {
  return state;
 }

 var subscribers = [];

 function dispatch(action) {
  var prevState = currentState;
  currentState = currentReducer(cloneDeep(currentState), action);
 }

 return {
  dispatch: dispatch
 };
}
We hand a copy of the current state and the action to the currentReducer, which uses the action to figure out what to do with the state. What is returned is a changed version of the copied state, which we then use to update the state. Also, we’re using a generic cloneDeepimplementation (in this case, we used lodash’s) to handle copying the state completely. Simply using Object.assign wouldn’t be suitable because it retains references to objects contained by the base level object properties.
Now that we have this updated state, we need to alert any part of the app that cares. That’s where the subscribers come in. We simply call to each subscribing function and hand them the current state and also the previous state, in case whoever’s subscribed wants to do delta comparisons:
function createStore() {
 var currentState = {};

 var currentReducer = function(state, action) {
  return state;
 }

 var subscribers = [];

 function dispatch(action) {
  var prevState = currentState;
  currentState = currentReducer(cloneDeep(currentState), action);
  subscribers.forEach(function(subscriber){
   subscriber(currentState, prevState);
  });
 }

 return {
  dispatch: dispatch
 };
}
Of course, none of this really does any good with just that default noop reducer. What we need is the ability to add reducers, as well.
In order to develop an appropriate reducer-adding API, let’s revisit what a reducer is, and how we might expect reducers to be used.
In the Three Principles section of Redux’s documentation, we can find this philosophy:
“To specify how the state tree is transformed by actions, you write pure reducers.”
So what we want to accommodate is something that looks like a state tree, but where the properties of the state are assigned functions that purely change their state.
{
 stateProperty1: function(state, action) {
  // does something with state and then returns it
 },
 stateProperty2: function(state, action) {
  // same
 }, ...
}
Yeah, that looks about right. We want to take this state tree object and run each of its reducer functions every time an action is dispatched.
We have currentReducer defined in the scope, so let’s just create a new function and assign it to that variable. This function will take the pure reducers we passed to it in the state tree object, and run each one, returning the outcome of the function to the key it was assigned.
function createStore() {
 var currentReducer = function(state, action) {
  return state;
 } ...

 function addReducers(reducers) {
  currentReducer = function(state, action) {
   var cumulativeState = {};

   for (key in reducers) {
    cumulativeState[key] = reducers[key](state[key], action);
   }

   return cumulativeState;
  }
 }
}
Something to note here: we’re only ever handing a subsection of the state to each reducer, keyed from its associated property name. This helps simplify the reducer API and also keeps us from accidentally changing other state areas of the global state. Your reducers should only be concerned with their own particular state, but that doesn’t preclude your reducers from taking advantage of other properties in the store.
As an example, think of a list of data, let’s say with a name “todoItems”. Now consider ways you might sort that data: by completed tasks, by date created, etc. You can store the way you sort that data into separate reducers (byCompleted and byCreated, for example) that contain ordered lists of IDs from the todoItems data, and associate them when you go to show them in the UI. Using this model, you can even reuse the byCreated property for other types of data aside from todoItems! This is definitely a pattern recommended in the Redux docs.
Now, this is fine if we add just one single set of reducers to the store, but in an app of any substantive size, that simply won’t be the case. So we should be able to accommodate different portions of the app adding their own reducers. And we should also try to be performant about it; that is, we shouldn’t run the same reducers twice.
// State tree 1
{
 visible: function(state, action) {
  // Manage visibility state
 } ...
}
// State tree 2
{
 visible: function(state, action) {
  // Manage visibility state (should be the same function as above)
 } ...
}
In the above example, you might imagine two separate UI components having, say, a visibility reducer that manages whether something can be seen or not. Why run that same exact reducer twice? The answer is “that would be silly”. We should make sure that we collapse by key name for performance reasons, since all reducers are run each time an action is dispatched.
So keeping in mind these two important factors — ability to ad-hoc add reducers and not adding repetitive reducers — we arrive to the conclusion that we should add another scoped variable that houses all reducers added to date.
...
function createStore() {
 ...
 var currentReducerSet = {};

 function addReducers(reducers) {
  currentReducerSet = Object.assign(currentReducerSet, reducers);

  currentReducer = function(state, action) {
   var cumulativeState = {};

   for (key in currentReducerSet) {
    cumulativeState[key] = currentReducerSet[key](state[key], action);
   }

   return cumulativeState;
  }

 }
 ...
}
...
The var currentReducerSet is combined with whatever reducers are passed, and duplicate keys are collapsed. We needn’t worry about “losing” a reducer because two reducers will both be the same if they have the same key name. Why is this?
To reiterate, a state tree is a set of key-associated pure reducer functions. A state tree property and a reducer have a 1:1 relationship. There should never be two different reducer functions associated with the same key.
This should hopefully illuminate for you exactly what is expected of reducers: to be a sort of behavioral definition of a specific property. If we have a “loading” property, what we’re saying with my reducer is that “this loading property should respond to this set specific actions in these particular ways”. We can either directly specify whether something is loading — think action name “START_LOADING“ — or we can use it to increment the number of things that are loading by having it respond to action names of actions that we know are asynchronous, such as for instance “LOAD_REMOTE_ITEMS_BEGIN” and “LOAD_REMOTE_ITEMS_END”.
Let’s fulfill a few more requirements of this API. We need to be able to add and remove subscribers. Easy:
function createStore() {
 var subscribers = [];
 ...

 function subscribe(fn) {
  subscribers.push(fn);
 }

 function unsubscribe(fn) {
  subscribers.splice(subscribers.indexOf(fn), 1);
 }

 return {
  ...
  subscribe: subscribe,
  unsubscribe: unsubscribe
 };
}
And we need to be able to provide the state when someone asks for it. And we should provide it in a safe way, so we’re going to only provide a copy of it. As above, we’re using a cloneDeep function to handle this so someone can’t accidentally mutate the original state, because in Javascript, as we know, if someone changes the value of a reference in the state object, it will change the store state.
function createStore() {
 ...

 function getState() {
  return cloneDeep(currentState);
 }

 return {
  ...
  getState: getState
 };
}
And that’s it for creating Redux! At this point, you should have everything you need to be able to have your app handle actions and mutate state in a stable way, the core fundamental ideas behind Redux.
Let’s take a look at the whole thing (with the lodash library):
var _ = require('lodash');
var globalStore;

function getInstance(){
 if (!globalStore) globalStore = createStore();
 return globalStore;
}

function createStore() {
 var currentState = {};
 var subscribers = [];
 var currentReducerSet = {};
 currentReducer = function(state, action) {
  return state;
 };

 function dispatch(action) {
  var prevState = currentState;
  currentState = currentReducer(_.cloneDeep(currentState), action);
  subscribers.forEach(function(subscriber){
   subscriber(currentState, prevState);
  });
 }

 function addReducers(reducers) {
  currentReducerSet = _.assign(currentReducerSet, reducers);
  currentReducer = function(state, action) {
   var ret = {};
   _.each(currentReducerSet, function(reducer, key) {
    ret[key] = reducer(state[key], action);
   });
   return ret;
  };
 }

 function subscribe(fn) {
  subscribers.push(fn);
 }

 function unsubscribe(fn) {
  subscribers.splice(subscribers.indexOf(fn), 1);
 }

 function getState() {
  return _.cloneDeep(currentState);
 }

 return {
  addReducers,
  dispatch,
  subscribe,
  unsubscribe,
  getState
 };
}
module.exports = getInstance();
So what did we learn by rewriting Redux?
We learned a few valuable things in this experience:
We must protect and stabilize the state of the store. The only way a user should be able to mutate state is through actions.
Reducers are pure functions in a state tree. Your app’s state properties are each represented by a function that provides updates to their state. Each reducer is unique to each state property and vice versa.
The store is singular and contains the entire state of the app. When we use it this way, we can track each and every change to the state of the app.
Reducers can be thought of as behavioral definitions of state tree properties.
Having the store is nice, but you’re probably going to want to use it with a framework. React is an obvious choice, as Redux was created to implement Flux, a core principle data architecture of React. So let’s do that too!
You know what would be cool? Making it a higher-order component, or HOC as you’ll sometimes see them called. We pass an HOC a component, and it creates a new component out of it. And it is also able to be infinitely nested, that is, HOCs should be able to be nested within each other and still function appropriately. So let’s start with that basis:
Note: Going to switch to ES6 now, because it provides us with class extension, which we’ll need to be able to extend React.Component.
import React from 'react';
export default function StoreContainer(Component, reducers) {
	return class extends React.Component { }
}
When we use StoreContainer, we pass in the Component class — either created with React.createClass or React.Component — as the first parameter, and then a reducer state tree like the one we created up above:
// Example of StoreContainer usage
import StoreContainer from 'StoreContainer';
import { myReducer1, myReducer2 } from 'MyReducers';

StoreContainer(MyComponent, {
 myReducer1,
 myReducer2
});
Cool. So now we have a class being created and receiving the original component class and an object containing property-mapped reducers.
So, in order to actually make this component work, we’re going to have to do a few bookkeeping tasks:
Get the initial store state
Bind a subscriber to the component’s setState method
Add the reducers to the store
We can bootstrap these tasks in the constructor lifecycle method of the Component. So let’s start with getting the initial state.
...
export default function StoreContainer(Component, reducers) {
 return class extends React.Component {

  constructor() {
   super(props);
   // We have to call this to create the initial React
   // component and get a `this` value to work with
   this.state = store.getState();
  }

 }
}
Next, we want to subscribe the component’s setState method to the store. This makes the most sense because setting state on the component will then set off the top-down changes the component will broadcast, as we’d want in the Flux model.
We can’t, however, simply send this.setState to the subscribe method of the store — their parameters don’t line up. The store wants to send new and old state, and the setState method only accepts a function as the second parameter.
So to solve this, we’ll just create a marshalling function to handle it:
...
import store from './Store';

function subscriber(currentState, previousState) {
 this.setState(currentState);
}

export default function StoreContainer(Component, reducers) {
 return class extends React.Component {

  constructor() {
   ...
   this.instSubscriber = subscriber.bind(this);
   store.subscribe(this.instSubscriber);
  }

  componentWillUnmount() {
   store.unsubscribe(this.instSubscriber);
  }
 }
}
...
Since the store is a singleton, we can just import that in and call on its API directly.
Why do we have to keep the bound subscriber around? Because binding it returns a new function. When unmounting the component, we want to be able to unsubscribe to keep things clean. We know that the store merely looks for the function reference in its internal subscribers array and removes it, so we need to make sure we keep that reference around so we can get it back when we need to identify and remove it.
One last thing to do in the constructor: add the reducers. This is as simple as passing what we received to the HOC into the store.addReducers method:
So now we’re ready to provide the rendering of the component. This is the essence of HOCs. We take the Component we received and render it within the HOC, imbuing it with whatever properties the HOC needs to provide it:
We are “spreading” the properties and state of the HOC down to the Component it is wrapping. This effectively ensures that whatever properties we pass to the HOC get down to the component it wraps, a vital feature of infinitely nestable HOCs. It may or may not be wise to place the state as properties on the Component, but it worked well in my testing, and it was nice being able to access to the state through the this.props object of the Component that is wrapped, as you might expect to normally do with a React component that receives data from a parent component.
Here’s the whole shabang:
import React from 'react'; import store from './Store';
function subscriber(currentState, previousState) {
 this.setState(currentState);
}

export default function StoreContainer(Component, reducers) {
 return class extends React.Component {

  constructor(props) {
   super(props);
   this.state = store.getState();
   this.instSubscriber = subscriber.bind(this);
   store.subscribe(this.instSubscriber);
   store.addReducers(reducers);
  }

  componentWillUnmount() {
   store.unsubscribe(this.instSubscriber);
  }

  render() {
   return (<Component {...this.props} {...this.state} />);
  }
 }
}
Implementation of using StoreContainer:
import StoreContainer from 'StoreContainer';
import { myReducer } from 'MyReducers';
let MyComponent extends React.Component {
 // My component stuff
}
export default StoreContainer(MyComponent, { myReducer });
Implementation of using the Component that uses StoreContainer (exactly the same as normal):
import MyComponent from 'MyComponent';
import ReactDOM from 'react-dom';
But you don’t have to define the data basis of your MyComponent immediately or in a long-lasting class definition; you could also do it more ephemerally, in implementation, and perhaps this is wiser for more generalized components:
import StoreContainer from 'StoreContainer';
import { myReducer } from 'MyReducers';
import GeneralizedComponent from 'GeneralizedComponent';
import ReactDOM from 'react-dom';
let StoreContainedGeneralizedComponent = StoreContainer(GeneralizedComponent, { myReducer });
ReactDOM.render(<StoreContainedGeneralizedComponent myProp='foo' />, document.body);
This has the benefit of letting parent components control certain child component properties.
Conclusion
By gaining a solid understanding of Redux through this blog, we hope teams can enhance their state management and write efficient, scalable code.
In addition to leveraging Redux, teams can further optimize their product development process by utilizing Jama Connect®‘s powerful features, such as Live Traceability™ and Traceability Score™, to improve engineering quality and speed up time to market.
Jama Connect empowers teams with increased visibility and control by enabling product development to be synchronized between people, tools, and processes across the end-to-end development lifecycle. Learn more here.
In this blog, we’ll recap our whitepaper, “When Evaluating Product Development Software Tools, Not All Cloud is Equal” – To download the entire whitepaper, click HERE.
When Evaluating Product Development Software Tools, Not All Cloud is Equal
As product development has become increasingly complex to manage across siloed teams and tools, the need for organizations to cost-effectively adapt and scale is increasingly important. Now that over 60% of corporate data is stored in the cloud. cloud-based tools have become mainstream within the engineering function. But the term “cloud” is used by vendors to describe a broad range of capabilities. Before making any software selection, it is important to understand what each vendor means when they say “cloud” and how to compare them.
The Different Types of Cloud Deployment Models: A Quick Primer
There are three types of cloud deployments: public, private, and hybrid.
Public Cloud: A public cloud infrastructure is managed by a cloud provider, and many companies use the same cloud provider. Public cloud offerings are often multi-tenant, meaning your application(s) is hosted alongside those of other companies; however, data is kept separate and secure. Some applications you might already use that leverage a multi-tenant cloud include Microsoft Outlook and Microsoft 365. Amazon Web Services (AWS) is the market share leader of public cloud providers.
Private Cloud (Outsourced Hosted): A private cloud is outsourced hosting of the application to a 3rd party. The outsource provider hosts and manages the application without the advantages of cloud architecture for scalability, high availability, security, and cost effectiveness. This approach is typically the most expensive and requires the most thorough security assessment. Often, software vendors who do not have the expertise to provide cloud hosting will outsource the hosting to their partners.
Hybrid Cloud: A hybrid cloud is a computing environment using private and public clouds and allowing applications and data to be shared between them.
Non-cloud deployment model:
On Premises (Self-hosted): A company chooses to host and manage the application themselves in their own environment. This approach is more expensive and requires the most internal resources.
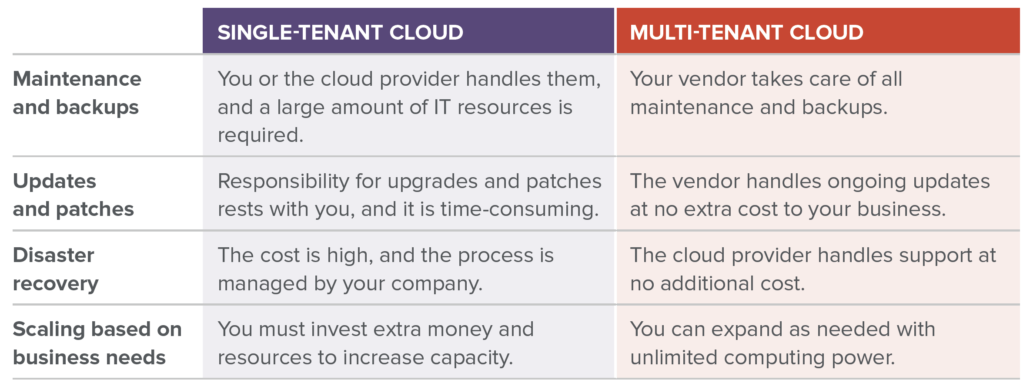
Single Tenant vs. Multi-tenant Clouds: What’s the Difference?
94% of enterprises use cloud applications and the majority of their data is already in the cloud1. Here are a few important differences when comparing single-tenant with multi-tenant clouds.
Single-tenant cloud
With a single-tenant cloud you have a single instance of the software application meant to be used by your business. A single-tenant cloud is like running the application on your IT department’s hardware on-premise, but since it operates in the cloud, you’re using the provider’s infrastructure.
The drawbacks of a single-tenant cloud
Vendors that are unable to offer a multi-tenant cloud often try to scare companies away from multi-tenancy by saying it is not as secure. Of course, the entire modern economy is running on multi-tenant cloud systems from email, collaboration, task management, CRM, banking, and financial transaction systems. The need to physically separate data for security has long been solved by logically separating data and sharing databases. A multi-tenant cloud is actually more secure than a single tenant cloud against any external intrusion since it has two layers of security within the cloud environment instead of just one. Additionally, there are significant costs and risks by refusing the benefits of multi-tenancy:
Setup is complicated. A single-tenant cloud sets up a deployment stack for every customer. The provider’s burden is multiplied by every customer, making operations inefficient and error-prone since each tenant must be handled individually. The multiplicative effect increases the risks of mistakes, configuration drift, and maintenance burden.
The cost is high. Operating a single-tenant cloud is more expensive than the multi-tenant alternative since it requires a dedicated deployment stack that must be 100% paid for by the customer even when processing time and storage are not utilized.
Resources aren’t optimized. With a single-tenant cloud, you aren’t fully utilizing your resources, often leaving computing power — and money — on the table. As a result, you lose the ability to share costs for things like system monitoring, serviceability, and deployment.
Scaling is not an option. With a single-tenant cloud, you lose the ability to scale up or down resources as you need them.
More complex backups, restoration, and disaster recovery. Backing up and restoring become a stack-by-stack operation that must be managed and validated individually. In the event of a disaster, there’s no telling where your instance ends up on the priority list since they must be restored one at a time. This option also creates a single point of failure.
Here are the main benefits of a multi-tenant cloud:
Lowers your costs. A multi-tenant cloud allows the provider to leverage economies of scale. Operations, maintenance, upgrades, and scaling are done across the infrastructure base instead of one at a time. Things like backups, disaster recovery, and upgrades become simple, single operations instead of thousands of checklist-style work items. This reduces the multiplicative risk of individual operations and lowers the overall total cost of ownership (TCO).
Uses resources more efficiently. A single-tenant cloud often leaves extra resources on the table. And since you’re paying for all of it whether you use it or not, excess computing power is wasted. A multi-tenant cloud allows you to use only what you need and pay less to access it.
Gets you up and running faster. Getting up and running fast is important whether you’re a large enterprise, a smaller business, or a start-up. A multi-tenant cloud helps you quickly scale up or down to maximize resources.
Completing updates is easier. A multi-tenant cloud handles all your upgrades and updates, so you are free from disruptions and the additional costs associated with staying current.
Backups and restoration are simplified. A multi-tenant cloud backs up relevant data and resources, supporting business continuity and resilience planning.
Key Considerations When Choosing a Cloud-Based Engineering Tool Provider
What is the uptime service level agreement (SLA)?
Cloud-based software providers should be able to report their uptime at any given time and show the history of the uptime over a year.
Jama Software® publicly shows our cloud status on a minute-to-minute basis at status.jamasoftware.com
Does the provider operate in a high availability environment?
It’s not enough to have your application hosted in a major cloud (AWS, Azure, GC), the provider must design their infrastructure to be fault tolerant and adaptable to different failure scenarios.
Cloud software providers like Jama Software® provide a cloud architecture diagram that shows fault tolerance and no single point of failure.
How does the provider protect you in the event of a disaster?
While cloud services are incredibly robust, things do happen! A fully documented, tested, and validated disaster recovery plan is essential to any cloud software provider’s continuity of service.
Jama Software has a disaster recovery plan that specifies RPO and RTO objectives and it is tested at least annually in a production environment scenario
What security guarantees does the cloud software provider make?
While the underlying cloud infrastructure is incredibly secure, the software provider must take steps to secure their application. Static and dynamic scans, PEN tests, and cloud best practices (OWASP) all play a role in securing the software and your data.
At Jama Software we take security seriously and protecting our customers’ data is our highest priority. We code with Open Web Application Security Project (OWASP) best practices, host in a secure AWS cloud, perform daily static and dynamic scans, PEN test (third-party) twice a year, and are in the process of our SOC 2 Type 2 audit. Once the audit is complete, we will be the only requirements management platform on the market with a SOC 2 Type 2 certification.
FDA Updates to the Medical Device Cybersecurity Guidance
With an increase in connected medical devices, cybersecurity has become a hot topic for regulatory agencies. In the last few years, cybersecurity incidents have impacted medical devices and hospital networks disrupting the delivery of medical care and potentially putting patients at risk. Cybersecurity is the process of preventing unauthorized access, modification, misuse, denial of use, or simply the unauthorized use of information that is stored, accessed, or transferred from a product to an external recipient.
The focus on cybersecurity has led to several cybersecurity related guidance documents being published in the last few years. These guidance documents can be used by manufacturers to ensure that they are addressing cybersecurity in a way that meets the expectation of regulatory agencies. Some of the most important guidance documents available include:
The FDA originally released the Content of Premarket Submissions for Management of Cybersecurity in Medical Devices guidance in 2014, which was a total of nine pages long and covered the elements of a cybersecurity process and the core functions of a cybersecurity framework (Identify, Protect, Detect, Respond, and Recover). The April 2022 update to the guidance is forty-nine pages and addresses cybersecurity as part of both the Quality Management System (QMS) and the Total Product Lifecycle (TPLC). According to the FDA, the changes in the guidance are intended to further emphasize the importance of ensuring that devices are designed securely and to be capable of mitigating emerging cybersecurity risks throughout the TPLC, as well as more clearly outline the FDA’s recommendations for premarket submission information to address cybersecurity concerns.
Keeping in mind that the changes to the guidance were to ensure that cybersecurity is addressed as part of the TPLC and the QMS, the following specific requirements have been added to the cybersecurity guidance:
The guidance attempts to ensure that manufacturers are doing everything needed to design devices that are secured. The FDA now requires manufacturers to implement development processes that account for and address cybersecurity risks as part of design controls (21 CFR 820.30). This includes identification of security risks, the design requirements for how the risks will be controlled, and evidence that the controls are effective.
The FDA recommends the implementation and adoption of a Secure Product Development Framework (SPDF) to address cybersecurity throughout the TPLC. An SPDF is a set of processes that reduce the number and severity of vulnerabilities in products throughout the device lifecycle; using an SPDF is one approach to help ensure that QSR requirements are met.
The guidance includes requirements for labeling to provide information pertaining to the device’s cybersecurity controls, potential risks, and other relevant information
The guidance requires a Security Risk Management Process (at an organizational level) to identify, assess and control security risks. The process for performing security risk management should be a distinct process from performing safety risk management as described in ISO 14971:2019. FDA recommends that manufacturers establish a security risk management process that encompasses design controls (21 CFR 820.30), validation of production processes (21 CFR 820.70), and corrective and preventive actions (21 CFR 820.100) to ensure both safety and security risks are adequately addressed. The Safety Risk Management process and the Security Risk Management Process, although separate, must be integrated, so that Security risks that can result in patient harm, once identified, can be evaluated and assessed for risk acceptability using the Safety Risk Management process. When a security risk or control measure could have a possible impact on patient safety or medical device effectiveness, then it should be included in the product risk assessment. Likewise, any risk control that could have an impact on security should be included in the security risk assessment.
FDA recommends that threat modeling be performed throughout the design process to inform and support the risk analysis activities.
The guidance requires that Cybersecurity risks posed by third party software components must be addressed and evidence be included in the Design History File.
The guidance recommends the use of a Software Bill of Materials (SBOM) and specifies the information required to be contained in the SBOM, or as part of the documentation.
The guidance specifies requirements for a Security Risk Management Plan and a Security Risk Management Report.
The guidance requires vulnerability testing and penetration testing, along with verification of effectiveness of security controls.
The guidance specifies a requirement for a Vulnerability Communication Plan, since cybersecurity risks evolve as technology evolves throughout a device’s TPLC, FDA recommends that manufacturers establish a plan for how they will identify and communicate vulnerabilities that are identified after releasing the device. The Vulnerability Communication Plan should also address periodic security testing.
In summary, the new FDA cybersecurity guidance raises the bar on how FDA expects industry to address cybersecurity throughout the TPLC and imposes requirements for additional deliverables, testing, and labeling.