This Features in Five video demonstrates how Jama Connect helps maintain Live Traceability across applications.
Jama Connect® Features in Five: Live Traceability™
Learn how you can supercharge your systems development process! In this blog series, we’re pulling back the curtains to give you a look at a few of the powerful features in Jama Connect®… in under five minutes.
In this Features in Five video, Jama Software® subject matter experts Neil Bjorklund, Sales Manager – Medical, and Steven Pink, Senior Solutions Architect, will demonstrate how Jama Connect helps maintain Live Traceability™ across applications.
VIDEO TRANSCRIPT:
Neil Bjorklund: So, what we wanted to do today is give you all a quick snapshot of what it looks like for Jama to be integrated across systems, and showing how Jama helps you all maintain Live Traceability across applications or what we call a connected digital thread.
As part of our demonstration today, we’re going to show you what that looks like across your V-Model here of system engineering, in which case we’re going to actually make a change from a Windchill item, so an item over in Windchill, making a change to a specification or a part over there. We’re going to trace from that Windchill item over to Jama at the subsystem design output level. So, you’ll be able to see those items synchronized across those applications. We’re then going to perform an Impact Analysis within Jama. So, that’s going to allow you to then visualize, if you were to make a change to a Windchill item, what impact does that have across your full system.
So, we’re going to then see that change cascade up to a system requirement level here. We’re going to then make a change to that system requirement, and Jama is going to have the suspect linking mechanism to be able to then identify what all items downstream could be impacted by this change. In which case, we’re going to show an example where a software requirement must be changed. We’re going to make that change, and we’re going to show that change and then cascade over into Jira.
Bjorklund: So, the idea here is that, by managing Live Traceability within Jama, maintaining Jama as integrated with other applications or ecosystems, you’re going to be able to visualize that connected digital thread and see changes take place from Windchill into Jama, over then into Jira.
Now, one thing to remember, this integration is very flexible. So, we can integrate from Jama over to Windchill PLM parts, problem reports, change requests, requirements, different folder structures, and so forth. Within the software side, obviously, we’re integrating with Jira, that’s very flexible. But, we can also integrate with other applications like Azure DevOps, PFS, things like that. So, again, this is just one example, just to highlight the flexibility here of Jama, and this workflow.
Steven Pink: Okay, so thank you, Neil, for that. Now, we’re taking a look at a spec here in Windchill. This is what we’re going to be making a change to today. I’m going to go ahead and make an edit to this, and this is what’s going to synchronize across into Jama. So, I’m going to update the description, update the specification within Windchill. We’ve now saved this update within Windchill. We’ve updated the description here, and this is going to synchronize across to Jama in real-time. So, I’m going to switch over to this speck from Windchill that has synced into Jama. I’ll refresh it here, and we’ll see the description has now updated in real-time. If we want to understand the impact this change could potentially have, we’ll use Jama’s Impact Analysis feature. This will allow us to look up and downstream from this specification.
So, based on those relationship rules Neil showed earlier in that Live Traceability in Jama, we can look from a spec, one of these subsystem design outputs, all the way upstream through hardware and software to those higher level system requirements to understand what the potential impact could be. So, I’ll go ahead and run this Impact Analysis. We’ll take a look, and it’ll find everything that’s directly and indirectly connected to this specification from Windchill.
Pink: We can see hardware requirements, the system requirement, a high-level user need, and maybe the system requirement is impacted by our change. We can click into the system requirement. If we need to make an update to this impacted system requirement, we can come in and modify the description here.
When I save this system requirement, Jama is actually going to identify everything downstream that has been impacted through the Suspect Link feature. So now, we’re flagging these downstream hardware and software requirements that could be impacted by the change we made to this higher-level system requirement. If there’s been an impact to this software requirement, for example, I can click into this software requirement. I can then edit the description to reflect the necessary updates based on that impact assessment.
And now, when I save this software requirement, this has been synchronized with Jira, so we’ll be able to see the updated software requirement updated into Jira in real-time. So, I’m going to switch over to Jira here, and this is that software requirement that we’re synchronizing. And now, we can see the update to that description has synced across to Jira in real-time, providing us Live Traceability between specifications in Windchill, through our requirements in Jama, all the way down through the lower level software and development work occurring in Jira.
Bjorklund: Okay, thank you, Steven, for that. So, this is a quick recap. So, we’ve gone from a item in Windchill. We made that change within Windchill. That change was automatically reflected over into Jama. We then performed Impact Analysis within Jama, made changes across our system-level requirements, which then cascaded changes down into our software requirements over in Jira. Now, again, this is just one example where we’ve taken a change, we’ve integrated Jama with different applications, but Jama has the ability to integrate with all the applications across your product development lifecycle, across that V-Model system engineering.
So, if there are groups that are maybe not using Jira, you’d certainly have the ability to then manage change across different applications and, Jama serves as that central system to be able to manage Live Traceability and maintain that connected digital thread. Thank you.
Redux is pretty simple. You have action creators, actions, reducers, and a store. What’s not so simple is figuring out how to put everything together in the best or most “correct” way. In this blog, we begin by explaining the motivation behind using Redux and highlight its benefits, such as predictable state management and improved application performance. It then delves into the core concepts of Redux, including actions, reducers, and the store, providing a step-by-step guide on how to implement Redux in a JavaScript application. We will emphasize the importance of understanding Redux’s underlying principles and showcases code examples to illustrate its usage.
To rewrite Redux, we used a wonderful article by Lin Clark as a reference point, as well as the Redux codebase itself, and of course, the Redux docs.
You may note we’re using traditional pre-ES6 Javascript throughout this article. It’s because everyone who knows Javascript knows pre-ES6 JS, and we want to make sure we don’t lose anyone because of syntax unfamiliarity.
The Store
Redux, as is the same with any data layer, starts with a place to store information. Redux, by definition of the first principle of Redux, is a singular shared data store, described by its documentation as a “Single source of truth”, so we’ll start by making the store a singleton:
var store;

function getInstance() {
 if (!store) store = createStore();
 return store;
}

function createStore() {
 return {};
}

module.exports = getInstance();
The dispatcher
The next principle is that the state of the store can only change in one way: through the dispatching of actions. So let’s go ahead and write a dispatcher.
However, in order to update state in this dispatcher, we’re going to have to have state to begin with, so let’s create a simple object that contains our current state.
function createStore() {
 var currentState = {};
}
Also, to dispatch an action, we need a reducer to dispatch it to. Let’s create a default one for now. A reducer receives the current state and an action and then returns a new version of the state based on what the action dictates:
function createStore() {
 var currentState = {};

 var currentReducer = function(state, action) {
  return state;
 }
}
This is just a default function to keep the app from crashing until we formally assign reducers, so we’re going to go ahead and just return the state as is. Essentially a “noop”.
The store is going to need a way to notify interested parties that an update has been dispatched, so let’s create an array to house subscribers:
function createStore() {
 var currentState = {};

 var currentReducer = function(state, action) {
  return state;
 }

 var subscribers = [];
}
Cool! OK, now we can finally put that dispatcher together. As we said above, actions are handed to reducers along with state, and we get a new state back from the reducer. If we want to retain the original state before the change for comparison purposes, it probably makes sense to temporarily store it.
Since an action is dispatched, we can safely assume the parameter a dispatcher receives is an action.
function createStore() {
 var currentState = {};

 var currentReducer = function(state, action) {
  return state;
 }

 var subscribers = [];

 function dispatch(action) {
  var prevState = currentState;
 }

 return {
  dispatch: dispatch
 };
}
We also have to expose the dispatch function so it can actually be used when the store is imported. Kind of important.
So, we’ve created a reference to the old state. We now have a choice: we could either leave it to reducers to copy the state and return it, or we can do it for them. Since receiving a changed copy of the current state is part of the philosophical basis of Redux, we’re going to go ahead and just hand the reducers a copy to begin with.
function createStore() {
 var currentState = {};

 var currentReducer = function(state, action) {
  return state;
 }

 var subscribers = [];

 function dispatch(action) {
  var prevState = currentState;
  currentState = currentReducer(cloneDeep(currentState), action);
 }

 return {
  dispatch: dispatch
 };
}
We hand a copy of the current state and the action to the currentReducer, which uses the action to figure out what to do with the state. What is returned is a changed version of the copied state, which we then use to update the state. Also, we’re using a generic cloneDeepimplementation (in this case, we used lodash’s) to handle copying the state completely. Simply using Object.assign wouldn’t be suitable because it retains references to objects contained by the base level object properties.
Now that we have this updated state, we need to alert any part of the app that cares. That’s where the subscribers come in. We simply call to each subscribing function and hand them the current state and also the previous state, in case whoever’s subscribed wants to do delta comparisons:
function createStore() {
 var currentState = {};

 var currentReducer = function(state, action) {
  return state;
 }

 var subscribers = [];

 function dispatch(action) {
  var prevState = currentState;
  currentState = currentReducer(cloneDeep(currentState), action);
  subscribers.forEach(function(subscriber){
   subscriber(currentState, prevState);
  });
 }

 return {
  dispatch: dispatch
 };
}
Of course, none of this really does any good with just that default noop reducer. What we need is the ability to add reducers, as well.
In order to develop an appropriate reducer-adding API, let’s revisit what a reducer is, and how we might expect reducers to be used.
In the Three Principles section of Redux’s documentation, we can find this philosophy:
“To specify how the state tree is transformed by actions, you write pure reducers.”
So what we want to accommodate is something that looks like a state tree, but where the properties of the state are assigned functions that purely change their state.
{
 stateProperty1: function(state, action) {
  // does something with state and then returns it
 },
 stateProperty2: function(state, action) {
  // same
 }, ...
}
Yeah, that looks about right. We want to take this state tree object and run each of its reducer functions every time an action is dispatched.
We have currentReducer defined in the scope, so let’s just create a new function and assign it to that variable. This function will take the pure reducers we passed to it in the state tree object, and run each one, returning the outcome of the function to the key it was assigned.
function createStore() {
 var currentReducer = function(state, action) {
  return state;
 } ...

 function addReducers(reducers) {
  currentReducer = function(state, action) {
   var cumulativeState = {};

   for (key in reducers) {
    cumulativeState[key] = reducers[key](state[key], action);
   }

   return cumulativeState;
  }
 }
}
Something to note here: we’re only ever handing a subsection of the state to each reducer, keyed from its associated property name. This helps simplify the reducer API and also keeps us from accidentally changing other state areas of the global state. Your reducers should only be concerned with their own particular state, but that doesn’t preclude your reducers from taking advantage of other properties in the store.
As an example, think of a list of data, let’s say with a name “todoItems”. Now consider ways you might sort that data: by completed tasks, by date created, etc. You can store the way you sort that data into separate reducers (byCompleted and byCreated, for example) that contain ordered lists of IDs from the todoItems data, and associate them when you go to show them in the UI. Using this model, you can even reuse the byCreated property for other types of data aside from todoItems! This is definitely a pattern recommended in the Redux docs.
Now, this is fine if we add just one single set of reducers to the store, but in an app of any substantive size, that simply won’t be the case. So we should be able to accommodate different portions of the app adding their own reducers. And we should also try to be performant about it; that is, we shouldn’t run the same reducers twice.
// State tree 1
{
 visible: function(state, action) {
  // Manage visibility state
 } ...
}
// State tree 2
{
 visible: function(state, action) {
  // Manage visibility state (should be the same function as above)
 } ...
}
In the above example, you might imagine two separate UI components having, say, a visibility reducer that manages whether something can be seen or not. Why run that same exact reducer twice? The answer is “that would be silly”. We should make sure that we collapse by key name for performance reasons, since all reducers are run each time an action is dispatched.
So keeping in mind these two important factors — ability to ad-hoc add reducers and not adding repetitive reducers — we arrive to the conclusion that we should add another scoped variable that houses all reducers added to date.
...
function createStore() {
 ...
 var currentReducerSet = {};

 function addReducers(reducers) {
  currentReducerSet = Object.assign(currentReducerSet, reducers);

  currentReducer = function(state, action) {
   var cumulativeState = {};

   for (key in currentReducerSet) {
    cumulativeState[key] = currentReducerSet[key](state[key], action);
   }

   return cumulativeState;
  }

 }
 ...
}
...
The var currentReducerSet is combined with whatever reducers are passed, and duplicate keys are collapsed. We needn’t worry about “losing” a reducer because two reducers will both be the same if they have the same key name. Why is this?
To reiterate, a state tree is a set of key-associated pure reducer functions. A state tree property and a reducer have a 1:1 relationship. There should never be two different reducer functions associated with the same key.
This should hopefully illuminate for you exactly what is expected of reducers: to be a sort of behavioral definition of a specific property. If we have a “loading” property, what we’re saying with my reducer is that “this loading property should respond to this set specific actions in these particular ways”. We can either directly specify whether something is loading — think action name “START_LOADING“ — or we can use it to increment the number of things that are loading by having it respond to action names of actions that we know are asynchronous, such as for instance “LOAD_REMOTE_ITEMS_BEGIN” and “LOAD_REMOTE_ITEMS_END”.
Let’s fulfill a few more requirements of this API. We need to be able to add and remove subscribers. Easy:
function createStore() {
 var subscribers = [];
 ...

 function subscribe(fn) {
  subscribers.push(fn);
 }

 function unsubscribe(fn) {
  subscribers.splice(subscribers.indexOf(fn), 1);
 }

 return {
  ...
  subscribe: subscribe,
  unsubscribe: unsubscribe
 };
}
And we need to be able to provide the state when someone asks for it. And we should provide it in a safe way, so we’re going to only provide a copy of it. As above, we’re using a cloneDeep function to handle this so someone can’t accidentally mutate the original state, because in Javascript, as we know, if someone changes the value of a reference in the state object, it will change the store state.
function createStore() {
 ...

 function getState() {
  return cloneDeep(currentState);
 }

 return {
  ...
  getState: getState
 };
}
And that’s it for creating Redux! At this point, you should have everything you need to be able to have your app handle actions and mutate state in a stable way, the core fundamental ideas behind Redux.
Let’s take a look at the whole thing (with the lodash library):
var _ = require('lodash');
var globalStore;

function getInstance(){
 if (!globalStore) globalStore = createStore();
 return globalStore;
}

function createStore() {
 var currentState = {};
 var subscribers = [];
 var currentReducerSet = {};
 currentReducer = function(state, action) {
  return state;
 };

 function dispatch(action) {
  var prevState = currentState;
  currentState = currentReducer(_.cloneDeep(currentState), action);
  subscribers.forEach(function(subscriber){
   subscriber(currentState, prevState);
  });
 }

 function addReducers(reducers) {
  currentReducerSet = _.assign(currentReducerSet, reducers);
  currentReducer = function(state, action) {
   var ret = {};
   _.each(currentReducerSet, function(reducer, key) {
    ret[key] = reducer(state[key], action);
   });
   return ret;
  };
 }

 function subscribe(fn) {
  subscribers.push(fn);
 }

 function unsubscribe(fn) {
  subscribers.splice(subscribers.indexOf(fn), 1);
 }

 function getState() {
  return _.cloneDeep(currentState);
 }

 return {
  addReducers,
  dispatch,
  subscribe,
  unsubscribe,
  getState
 };
}
module.exports = getInstance();
So what did we learn by rewriting Redux?
We learned a few valuable things in this experience:
We must protect and stabilize the state of the store. The only way a user should be able to mutate state is through actions.
Reducers are pure functions in a state tree. Your app’s state properties are each represented by a function that provides updates to their state. Each reducer is unique to each state property and vice versa.
The store is singular and contains the entire state of the app. When we use it this way, we can track each and every change to the state of the app.
Reducers can be thought of as behavioral definitions of state tree properties.
Having the store is nice, but you’re probably going to want to use it with a framework. React is an obvious choice, as Redux was created to implement Flux, a core principle data architecture of React. So let’s do that too!
You know what would be cool? Making it a higher-order component, or HOC as you’ll sometimes see them called. We pass an HOC a component, and it creates a new component out of it. And it is also able to be infinitely nested, that is, HOCs should be able to be nested within each other and still function appropriately. So let’s start with that basis:
Note: Going to switch to ES6 now, because it provides us with class extension, which we’ll need to be able to extend React.Component.
import React from 'react';
export default function StoreContainer(Component, reducers) {
	return class extends React.Component { }
}
When we use StoreContainer, we pass in the Component class — either created with React.createClass or React.Component — as the first parameter, and then a reducer state tree like the one we created up above:
// Example of StoreContainer usage
import StoreContainer from 'StoreContainer';
import { myReducer1, myReducer2 } from 'MyReducers';

StoreContainer(MyComponent, {
 myReducer1,
 myReducer2
});
Cool. So now we have a class being created and receiving the original component class and an object containing property-mapped reducers.
So, in order to actually make this component work, we’re going to have to do a few bookkeeping tasks:
Get the initial store state
Bind a subscriber to the component’s setState method
Add the reducers to the store
We can bootstrap these tasks in the constructor lifecycle method of the Component. So let’s start with getting the initial state.
...
export default function StoreContainer(Component, reducers) {
 return class extends React.Component {

  constructor() {
   super(props);
   // We have to call this to create the initial React
   // component and get a `this` value to work with
   this.state = store.getState();
  }

 }
}
Next, we want to subscribe the component’s setState method to the store. This makes the most sense because setting state on the component will then set off the top-down changes the component will broadcast, as we’d want in the Flux model.
We can’t, however, simply send this.setState to the subscribe method of the store — their parameters don’t line up. The store wants to send new and old state, and the setState method only accepts a function as the second parameter.
So to solve this, we’ll just create a marshalling function to handle it:
...
import store from './Store';

function subscriber(currentState, previousState) {
 this.setState(currentState);
}

export default function StoreContainer(Component, reducers) {
 return class extends React.Component {

  constructor() {
   ...
   this.instSubscriber = subscriber.bind(this);
   store.subscribe(this.instSubscriber);
  }

  componentWillUnmount() {
   store.unsubscribe(this.instSubscriber);
  }
 }
}
...
Since the store is a singleton, we can just import that in and call on its API directly.
Why do we have to keep the bound subscriber around? Because binding it returns a new function. When unmounting the component, we want to be able to unsubscribe to keep things clean. We know that the store merely looks for the function reference in its internal subscribers array and removes it, so we need to make sure we keep that reference around so we can get it back when we need to identify and remove it.
One last thing to do in the constructor: add the reducers. This is as simple as passing what we received to the HOC into the store.addReducers method:
So now we’re ready to provide the rendering of the component. This is the essence of HOCs. We take the Component we received and render it within the HOC, imbuing it with whatever properties the HOC needs to provide it:
We are “spreading” the properties and state of the HOC down to the Component it is wrapping. This effectively ensures that whatever properties we pass to the HOC get down to the component it wraps, a vital feature of infinitely nestable HOCs. It may or may not be wise to place the state as properties on the Component, but it worked well in my testing, and it was nice being able to access to the state through the this.props object of the Component that is wrapped, as you might expect to normally do with a React component that receives data from a parent component.
Here’s the whole shabang:
import React from 'react'; import store from './Store';
function subscriber(currentState, previousState) {
 this.setState(currentState);
}

export default function StoreContainer(Component, reducers) {
 return class extends React.Component {

  constructor(props) {
   super(props);
   this.state = store.getState();
   this.instSubscriber = subscriber.bind(this);
   store.subscribe(this.instSubscriber);
   store.addReducers(reducers);
  }

  componentWillUnmount() {
   store.unsubscribe(this.instSubscriber);
  }

  render() {
   return (<Component {...this.props} {...this.state} />);
  }
 }
}
Implementation of using StoreContainer:
import StoreContainer from 'StoreContainer';
import { myReducer } from 'MyReducers';
let MyComponent extends React.Component {
 // My component stuff
}
export default StoreContainer(MyComponent, { myReducer });
Implementation of using the Component that uses StoreContainer (exactly the same as normal):
import MyComponent from 'MyComponent';
import ReactDOM from 'react-dom';
But you don’t have to define the data basis of your MyComponent immediately or in a long-lasting class definition; you could also do it more ephemerally, in implementation, and perhaps this is wiser for more generalized components:
import StoreContainer from 'StoreContainer';
import { myReducer } from 'MyReducers';
import GeneralizedComponent from 'GeneralizedComponent';
import ReactDOM from 'react-dom';
let StoreContainedGeneralizedComponent = StoreContainer(GeneralizedComponent, { myReducer });
ReactDOM.render(<StoreContainedGeneralizedComponent myProp='foo' />, document.body);
This has the benefit of letting parent components control certain child component properties.
Conclusion
By gaining a solid understanding of Redux through this blog, we hope teams can enhance their state management and write efficient, scalable code.
In addition to leveraging Redux, teams can further optimize their product development process by utilizing Jama Connect®‘s powerful features, such as Live Traceability™ and Traceability Score™, to improve engineering quality and speed up time to market.
Jama Connect empowers teams with increased visibility and control by enabling product development to be synchronized between people, tools, and processes across the end-to-end development lifecycle. Learn more here.
G2 Again Names Jama Connect® the Standout Leader in Requirements Management Software in their Spring 2023 Grid® Report
In addition to the honor of being named the standout leader in requirements management software (for both Mid-Market and Enterprise), we are proud to showcase that we were awarded the Users Most Likely to Recommend badge as well as several additional medals for Spring 2023, including:
Users Most Likely to Recommend: Earned the highest rating among other solutions in this category.
Users Love Us: For products that have collected 20 reviews with an average rating of 4.0 stars.
Fastest Implementation: For products that had the shortest go-live time in its category.
Easiest Setup: The product that earned the highest Ease of Setup rating in its category.
Easiest to Use: The product in the Usability Index earned the highest Ease of Admin rating in its category.
Easiest Admin: For products that earn the highest Ease of Admin rating in their category.
Momentum Leader: Products in the Leader tier in the Momentum Grid® rank in the top 25% of their category’s products by their users.
Enterprise Leader: For products rated highly by G2 users and have substantial Satisfaction and Market Presence scores.
Download the full report to see why customers love using Jama Connect for product, systems, and software development.
Learn More About the Spring 2023 G2 Grid for the top Requirements Management Software productsHERE!
We live vicariously through the successes of our customers. The “Users Love Us” category, in particular, is a testament to our commitment to our customers.
At Jama Software®, we’re proud to be recognized as the leader in requirements management software. We’re grateful to our customers for their invaluable feedback on their experiences using Jama Connect for requirements management. We remain committed to providing them with the expert knowledge, attention, and resources they need to help them achieve their goals.
“Powerful tool that makes traceability easy. I’ve found Jama Connect to be a great platform for managing my project requirements. It has a simple user interface but also allows for a lot of customization for my own company’s needs. I work in the medical device industry and find this software essential for tracking our internal requirements as well as external regulatory requirements.”
-From review collected and hosted on G2.com, Andrew P, Lead Product Engineer – Systems and Usability – Small Business
We strive to provide our customers with the best level of service possible, and we look forward to supporting them with our expertise.
“I’ve been satisfied with Jama for years. Everything just works. The administrative tools are flexible and allow configuration to match our team’s workflow. It has highly configurable reports to allow us to export data for use in our document control system..”
-From review collected and hosted on G2.com, Allan P., Principal Test Engineer – Enterprise
From all of us at Jama Software to all of you, thank you!
G2 scores products and sellers based on reviews, gathered from their user community, as well as data aggregated from online sources and social networks. Together, these scores are mapped on their proprietary G2 Grid®, which can be used to compare products, streamline the buying process, and quickly identify the best products based on the experiences of your peers.
Jama Connect® Features in Five: Using Jama Connect with a Quality Management System (QMS) for Medical Device & Life Sciences
Learn how you can supercharge your systems development process! In this blog series, we’re pulling back the curtains to give you a look at a few of Jama Connect®’s powerful features… in under five minutes.
In this Features in Five video, Steven Pink, Senior Solutions Architect at Jama Software®, will provide insight into how Jama Connect is commonly used in the context of a medical device Quality Management System (QMS.)
In this video, we will:
Provide insight on how Jama Connect is commonly used in the context of a medical device quality management system
Demonstrate key features that provide value to those responsible for quality and regulatory matters
Offer clear guidance on how Jama Connect – a requirements management solution – supplements a separate quality management system within a cohesive ecosystem of complimentary applications
VIDEO TRANSCRIPT:
Steven Pink: Welcome to this segment of Features in Five. I’m Steven Pink, a senior solutions architect at Jama Software and today I’ll be giving an overview to help provide some insight into how Jama Connect is commonly used in the context of a medical device quality management system.
We’ll demonstrate some of the key features that provide value to those responsible for quality and regulatory matters and clear guidance on how Jama Connect, a requirements management solution supplements a separate quality management system within a cohesive ecosystem of complimentary applications.
We often work with medical device or life science companies that have some form of quality management system whether that be paper-based or an eQMS and they’re working to introduce a requirements management solution like Jama Connect for the first time.
For individuals with a quality and regulatory background that have not yet worked in an environment using a formal requirements management solution, this can seem like a foreign and potentially disruptive change to a well-defined process.
Pink: So before we provide some insight to help address that common concern, we want to provide some context as to why an organization would want to introduce Jama Connect in the first place. Prior to using a formal requirements management solution, engineering and R&D are often left managing requirements related data during development in documents, spreadsheets and tools like Jira, Confluence, or SharePoint that are not designed to support complex requirements management.
In this type of scenario, engineering often finds it difficult to manage and maintain complex traceability as they work. So they often leave it to be completed at the end of a phase or milestone as opposed to maintained in real time. This often leads to gaps or errors being identified late in development which is significantly more costly to address the later they’re identified. In addition to having difficulty maintaining traceability, engineering often struggles to manage change to requirements and understand the full impact of each change.
They’ll find it hard to keep data in sync between requirements stored in documents or spreadsheets and other tools like Jira or Azure DevOps where data resides in silos. They’ll often waste a lot of time or effort compiling documentation for their design history file at the end of a given phase before these artifacts can be signed off and stored as an auditable record in a document control system. As products increase in complexity and regulatory guidelines continue to increase in rigor, these challenges grow exponentially for engineering.
To help address these challenges, Jama Connect provides engineering and product teams with a working environment to manage requirements, risks, tests and the traceability between these items in real time. We call this managing live traceability.
Pink: From a quality and regulatory perspective, Jama Connect’s relationship rule diagram provides a governing structure to ensure that requirement traceability is maintained following proper design controls and quality procedures. This structure makes it simple to manage change, perform impact analysis, and ensure traceability coverage throughout development.
The first thing we see when working on a project in Jama Connect is the dashboard with traceability rules. This makes it easy to understand the expectations for traceability and identify exceptions through dashboard widgets, such as gaps in test coverage or finding unmitigated risks.
With data living and Jama Connect, managing documentation and traceability becomes easier. Once documentation has been authored, it can be sent for a formalized review. Cross-functional teams can utilize the review center to conduct iterative reviews and significantly increase the quality and efficiency of the feedback being given.
Once all items for a given release have been reviewed and approved, these items can automatically transition into an accepted and blocked state, ensuring that changes are not made to approved items unintentionally. When the time comes to generate auditable documentation, Jama Connect allows teams to automatically or manually capture baselines and export these baseline documents out of the system to be signed off in a separate document control system as an auditable record. This process reduces the time spent manually reworking documents as part of the QMS process. And these document export templates can easily be customized to match existing internal quality standards and ensure consistency in the way requirements and other details are documented.
In the end, Jama Connect can help engineering team more easily manage their work and simplify the process of maintaining traceability. As a byproduct of their efforts, quality, and regulatory teams are provided with higher-quality auditable documents without making changes to their existing quality management systems.
Revolutionize Your Software Development Process with Seamless Integration of Jama Connect and Atlassian Jira
Nearly all of Jama Software®’s clients engage in software development to some degree. In some cases, the products they build are entirely software-based, and in others, software is just one critical component of a more complex system.
Because most software engineering teams use Atlassian Jira as their central development hub, Jama Software provides a direct link between Jama Connect® and Jira through our integration platform, Jama Connect Interchange™.
As the Product Manager for Jama Connect Interchange (JCI), I often get asked by customers for best practices and examples of how to integrate Jama Connect with Jira, so their teams can collaborate across these tools more seamlessly.
For the most part, the customers I talk to aren’t interested in discussing high-level theories and best practices for software development (though our seasoned consulting team is always happy to provide advice in this area!). Rather, customers are looking for ground floor examples and use cases to reconnect their disconnected teams and processes.
Our customers know that in order to finish projects on time and on budget, the two most important tools in their software development ecosystem – Jama Connect and Jira – need to talk to each other directly. That’s where a targeted integration workstream comes in.
Jama Connect-Jira Integration Examples
Today, I’m going to share a few of the most successful Jama Connect to Jira integration examples we’ve seen. These examples can be implemented on their own or layered together for a more advanced workstream.
Keep in mind that this is not an exhaustive list! If your team has another workstream they’re loving, I’d encourage you to post about it in the JCI Sub-Community for others to see.
Editor’s Note: The terminology included below may vary slightly depending on your industry.
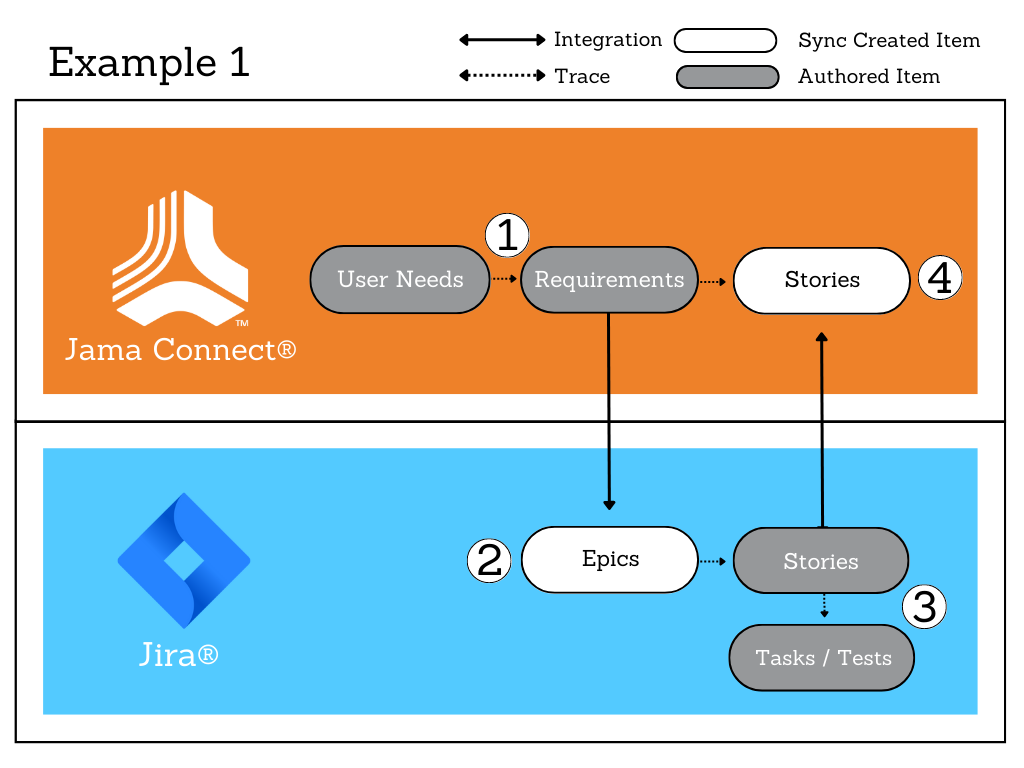
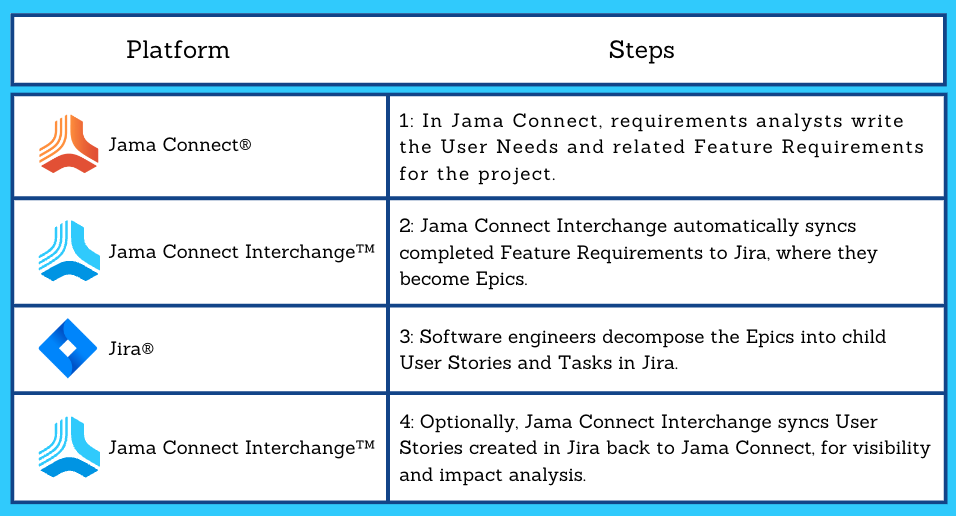
Example #1 (Agile Development Workstream) – Requirements in Jama Connect, Stories and Tasks in Jira
Most of our customers have the best success by completing their higher-level product planning in Jama Connect, while reserving Jira for more granular task execution by the software engineering team.
This is because Jira excels at task management, while Jama Connect’s built-in requirements traceability, risk management, and test management capabilities make it the ideal place to track your project in a holistic manner.
With the following model, you send software requirements from Jama Connect to Jira for execution at distinct points in the project’s lifecycle when software development activity occurs.
Rather than sync full hierarchies of items (requirements, user stories, tasks, etc.) back and forth unnecessarily, we set up JCI to sync just the relevant information at the time it is needed by the receiving team. This provides greater focus and prevents duplication of effort or conflicting changes.
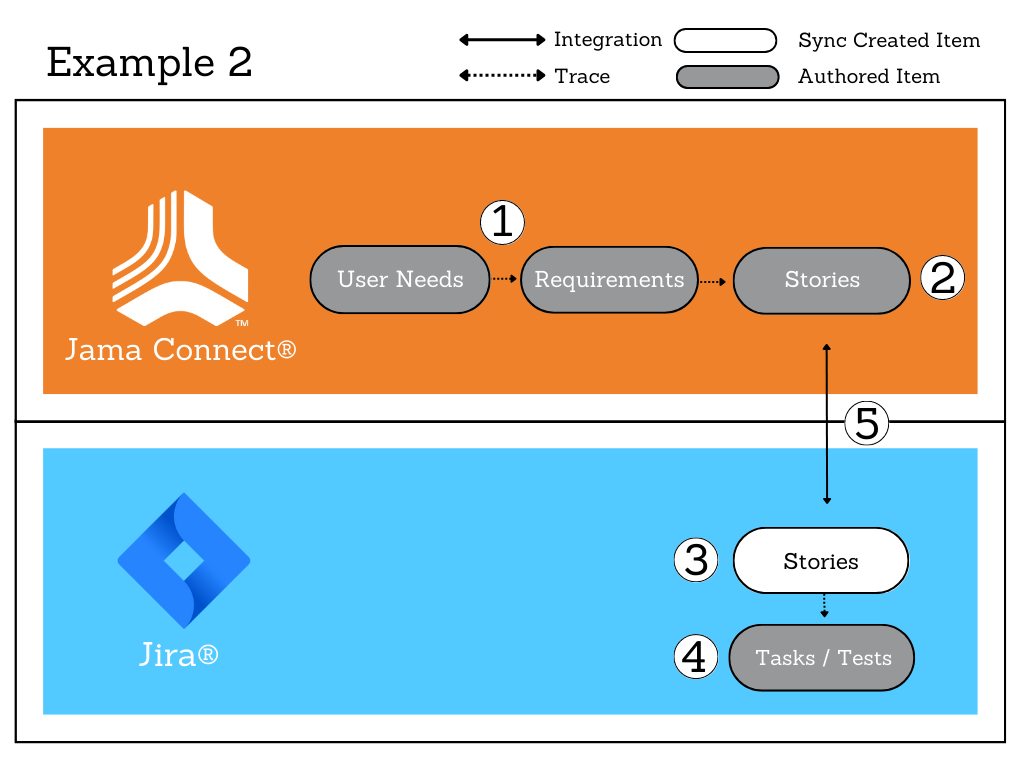
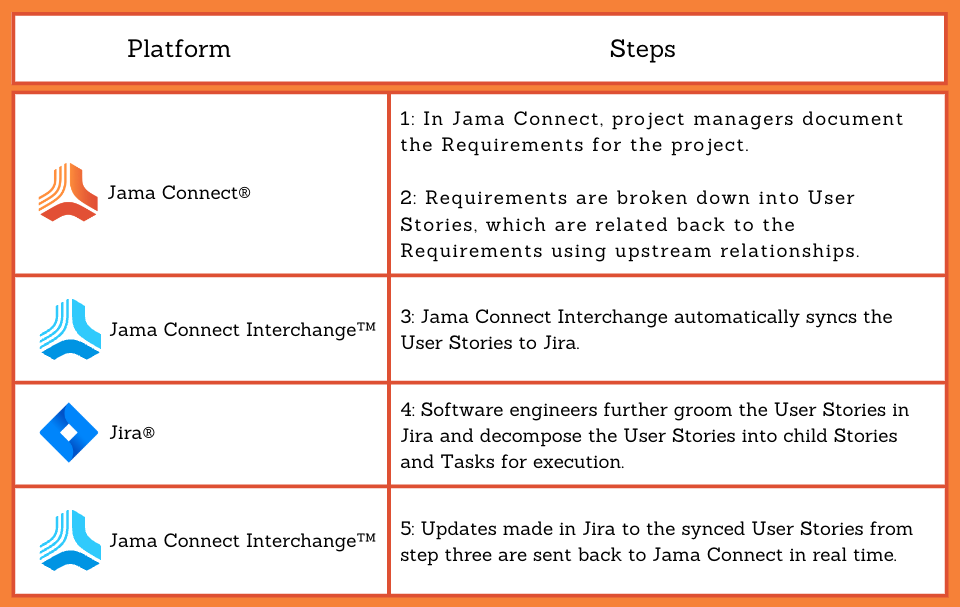
Example #2 (Project Management Workstream) – Requirements and Stories in Jama Connect, Tasks in Jira
This example is similar to the first, except that User Stories are authored in Jama Connect rather than in Jira. Use this workstream if the Project Manager or Product Manager typically breaks down requirements into more granular units of work (stories) during the planning phase, before passing them off to the development team for execution.
With this workstream, each team works in their tool of choice, and when information is shared by multiple teams, that information is visible from both tools and synced in real time.
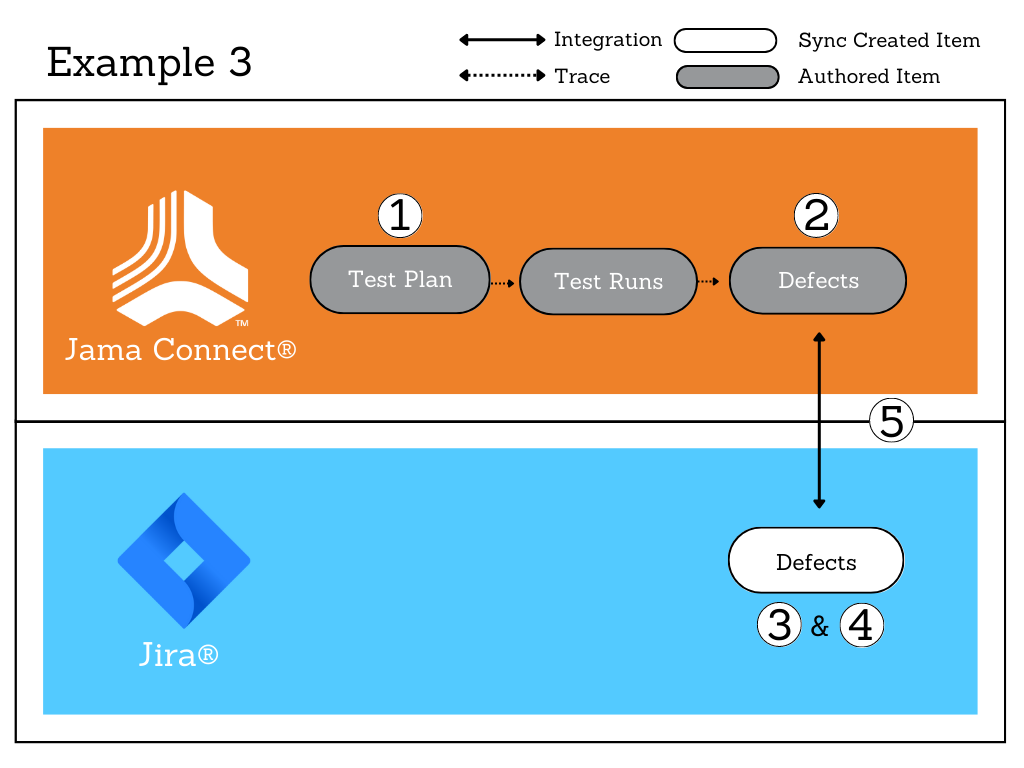
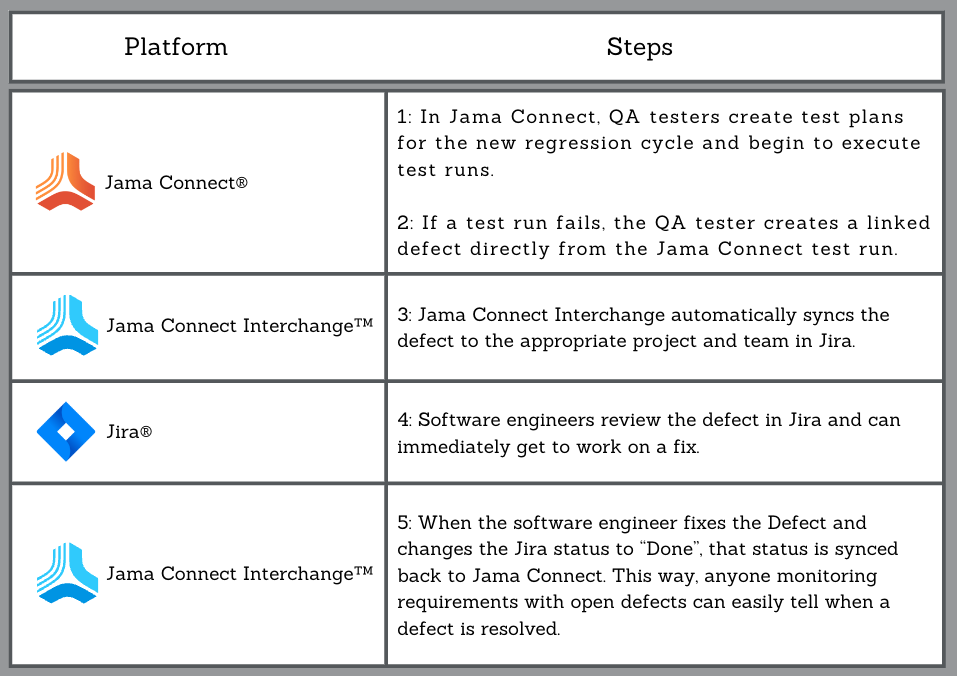
Example # 3 – Never Miss a Regression Defect
The regression testing cycle that accompanies each new software release can be chaotic if you don’t have an airtight process in place. During regression, Jama Software’s own development teams use JCI to streamline communication between our QA testers (who work in Jama Connect) and software engineers (who work in Jira). This ensures that any regression defects reported by QA are instantly sent to engineers for triage, and the release is not held up.
Here is how it works:
Since defects are automatically synced to Jira soon as they are reported, we eliminate any potential communication delays between the two teams, and more importantly, we ensure that no defects get missed.
Jama Connect Interchange is an integration platform that seamlessly integrates Jama Connect with other best-of-breed tools, like Atlassian Jira and Microsoft Excel.
JCI is built, supported, and continuously enhanced by dedicated teams at Jama Software. This means that JCI is deeply integrated with Jama Connect configurations and workstreams, providing you with a smart and seamless sync.
JCI supports both cloud-based and self-hosted instances of Jama Connect. To find out whether JCI would be a good fit for your organization, contact your Customer Success Manager.
In this blog, we recap our press release, “Jama Software® Announces Insurance Framework to Simplify Insurance Product Development ” – To read the entire thing, click HERE
Jama Software® Announces Insurance Framework to Simplify Insurance Product Development
Streamline and Accelerate Insurance Product Development with Jama Connect®
Jama Software®, the industry-leading requirements management and traceability solution provider, has released an insurance framework and dataset that streamlines and simplifies product development for the insurance industry.
With increased challenges and a changing landscape, insurance carriers are facing competitive pressures related to growth and profitability. Carriers can now use Jama Connect® to make product development more efficient and deliver high quality products on time and on budget.
“Insurance carriers are facing increased pressure to bring new and competitive products to market, across multiple jurisdictions and lines of business. At Jama Software, we’ve developed a customizable framework to allow our insurance customers to create a scalable and standardized approach to managing their up-front product requirements through downstream systems development. This framework allows carriers to innovate, bring products to market quicker, and ultimately better serve their customers.”
Steven Meadows, Solutions Lead for Insurance Industry, Jama Software
“With the increased complexity associated with developing insurance products, the traditional method of insurance product development is no longer viable.” stated Tom Tseki, Chief Revenue Officer at Jama Software. “The challenges associated with business analysts leveraging spreadsheets to try to ensure everyone is working off a live single source of truth is nearly impossible. Business analysts are constantly chasing development teams to get progress and status updates while trying to manage changes and inform all the upstream and downstream activities/teams of the changes before too much work is completed. This disjointed and out-of-sync approach means a lack of real-time visibility and control which results in significant rework, increased costs, and product delays.” Tseki continued.
“A real solution for managing insurance product requirements and specifications across multiple states, products, and departments has long been overdue. Jama Connect is that solution, bringing business units and IT together on a common requirements platform. It’s intuitive enough for non-technical users, configurable around existing processes and toolsets, and sophisticated enough to support everything from requirements reuse, comparisons, collaboration, change control, integrated test management, and more. As product portfolios get more complex, it’s important to manage requirements so they don’t manage you. The Jama Connect insurance framework places your organization in the driver’s seat – increasing product quality and standardization, speed to market, and scalability. It’s a game changer.”
With effective requirements management and Live Traceability™ in Jama Connect, insurance carriers can easily manage new product requirements from ideation through to implementation, enhancement, and revisions — enabling them to meet regulatory requirements, maximize development efficiency, and accelerate speed to market.
If you want to learn more about how Jama Connect can help accelerate insurance product development, please download the datasheet below, or click here to speak with one of our experts and book a free trial.
If you want to learn more about how Jama Connect can help accelerate insurance product development,
please refer to our datasheet: Download the Datasheet
About Jama Software
Jama Software is focused on maximizing innovation success for complex development. Numerous firsts for humanity in fields such as fuel cells, electrification, space, autonomous vehicles, surgical robotics, and more all rely on Jama Connect® to minimize the risk of product failure, delays, cost overruns, compliance gaps, defects, and rework. Jama Connect uniquely creates Live Traceability™ through siloed development, test, and risk activities to provide end-to-end compliance, risk mitigation, and process improvement. Our rapidly growing customer base of more than 12.5 million users across 30 countries spans the automotive, insurance, financial services, medical devices, semiconductor, aerospace & defense and industrial manufacturing industries. For more information about how Jama Connect can help Insurance industries, please visit: Jama Software Solutions: Financial Services and Insurance
Jama Connect® Features in Five: Finding Information
Learn how you can supercharge your systems development process! In this blog series, we’re pulling back the curtains to give you a look at a few of Jama Connect®’s powerful features… in under five minutes.
In this Features in Five video, Carleda Wade, Senior Consultantat Jama Software®, walks viewers through various ways of filtering and finding information within Jama Connect.
In this session, viewers will learn:
How to find information within Jama Connect®
Use search boxes throughout the application
Use facet filters to narrow search results
Interact with predefined filters
Create and manage new filters
Follow along with this short video below to learn more – and find the full video transcript below!
VIDEO TRANSCRIPT:
Carleda Wade: In this session, we will learn how to find information within Jama Connect, use search boxes throughout the application, use facet filters to narrow search results, interact with predefined filters, and create and manage new filters. So now let’s jump into our Jama instance.
Now we’re going to show you a couple different ways that you can search throughout the software. So here on our homepage we have this search bar. So let’s say I’d like to look for scheduling, since we just did manual scheduling in the previous session.
If I click on submit, you’ll see all these results. These results will show anytime the word scheduling shows up in any of the various projects. As you can see, this is a lot of results. So maybe we want to apply a filter so that we can narrow our list. So here I can click on filter items, and maybe potentially search for a keyword.
But I can also narrow this by looking at a certain project. So we’ve been working in our Jama 101, and then maybe I want to just look at system requirements, and let’s say stakeholder requirements. So here you’ll see are just the items that meet those two requirements. Another way to do this is by an advanced search. If I do an advanced search, first I can create a new filter. So let’s say I want to look for scheduling in my Jama 101 project, and I want to look at system requirements with the keyword of scheduling. When I do this, you can see here that I can preview, and that there will be three results. So if I click on there, it will give me a preview. And I can choose to save my filter. So now, essentially I’ve created a brand new filter.
Next, if I click here from my project explorer on filters, you’ll be able to see all of the various filters that are available. If I click on bookmarks, you’ll see this is the one that I just created, scheduling. And this little icon here indicates that it’s been bookmarked, or it’s become one of my favorites. If I go through the all, you can see other filters that have already been created within the system.
Wade: So let’s take a look at what happens when you right click. So when you right click on a filter. There are a few different options. So I could choose to remove this from my bookmarks if I so to desire. I could also choose to duplicate this. So let’s say for instance, this particular filter houses a lot of good information, and I want to be able to modify that information without changing the original filter. Maybe I would first duplicate this filter, then add onto it. I could also choose to edit the filter and view the criteria. If so desired, I could delete it. Another way to do this is by an advanced search. If I do an advanced search, first I can create a new filter. So let’s say I want to look for scheduling in my Jama 101 project, and I want to look at system requirements with the keyword of scheduling.
When I do this, you can see here that I can preview, and that there will be three results. So if I click on there, it will give me a preview. And I can choose to save my filter. So now, essentially I’ve created a brand new filter. Next, if I click here from my project explorer on filters, you’ll be able to see all of the various filters that are available. If I click on bookmarks, you’ll see this is the one that I just created, scheduling. And this little icon here indicates that it’s been bookmarked, or it’s become one of my favorites. If I go through the all, you can see other filters that have already been created within the system.
So let’s take a look at what happens when you right click. So when you right click on a filter. There are a few different options. So I could choose to remove this from my bookmarks if I so to desire. I could also choose to duplicate this. So let’s say for instance, this particular filter houses a lot of good information, and I want to be able to modify that information without changing the original filter. Maybe I would first duplicate this filter, then add onto it. I could also choose to edit the filter and view the criteria. If so desired, I could delete it.
Wade: Another really interesting thing to see is if I choose to apply the filter to the explorer. When I do that, you’ll see that only the items that meet the filter requirements show up, instead of the full exploratory like it did before. So that’s pretty interesting.
Going back in, the last option is send for review. So let’s say for instance, for this stakeholder requirements in draft status. If I wanted to go ahead and move these requirements from draft, I could choose right here from the filtered screen to send this for a review. And it would just open up in the review center. Another really interesting thing to see is if I choose to apply the filter to the explorer. When I do that, you’ll see that only the items that meet the filter requirements show up, instead of the full exploratory like it did before. So that’s pretty interesting.
Going back in, the last option is send for review. So let’s say for instance, for this stakeholder requirements in draft status. If I wanted to go ahead and move these requirements from draft, I could choose right here from the filtered screen to send this for a review. And it would just open up in the review center. Another way to be able to search is if we go to our activity stream. So here you can see there’s a little search bar for our activity stream. So let’s say I also typed in scheduling here. Or let’s say I wanted to see what Sarah has done within my stream. Here you can see all of the activities that Sarah has done within my instance here.
Another way to search for information is, let’s go back into our manual scheduling and go to our activities. Here you’ll see we have yet another search function, if we’d like. And then also, we could apply filters here if we so desire. Also, whenever using filters such as either here or any of the locations, we can also use built in operators. So let’s say we wanted to look for intelligent and scheduling in our project. You’ll see here that it comes up.
Jama Connect® vs. IBM®DOORS®: Total Cost of Ownership: A User Experience Roundtable Chat
Increasing industry challenges and complexities are pushing innovative organizations to consider modernizing the tool(s) they use for requirements management (RM). In this blog series, Jama Connect® vs. IBM® DOORS®: A User Experience Roundtable Chat, we’ll present several information-packed video blogs covering the challenges that teams face in their project management process.
In the 10th and final episode of our Roundtable Chat series, Preston Mitchell – Sr Director, Global Business Consulting at Jama Software® – and Susan Manupelli – Senior Solutions Architect at Jama Software® – discuss the total cost of ownership in product management.
To watch other episodes in this series, click HERE.
Watch the full video and find the video transcript below to learn more!
VIDEO TRANSCRIPT:
Preston Mitchell: All right. Welcome everybody, to episode 10 in our vlog series. Today, we’re going to be talking about total cost of ownership. I’m Preston Mitchell, the senior director of solutions at Jama Software, and I’m joined by my colleague, Susan Manupelli. Susan, do you want to introduce yourself?
Susan Manupelli: Sure. My name’s Susan Manupelli. I’m a senior solutions architect here at Jama Software, but I came from IBM, where I was a test architect for the last 20 years on some of their requirements management tools, so primarily Rational DOORS Next Generation and RequisitePro actually, before that.
Preston Mitchell: Excellent. Like Susan, I was a former IBM-er as well, so a user of many of those tools. Today, as you can see, we want to talk about kind of three main categories of total cost of ownership, IT infrastructure, so these are things like the actual physical hardware, the FTE administration costs, so like upgrades, maintenance, and then also the opportunity costs of when you do not adopt best-in-breed tools and processes. Why don’t we first start it off with the IT infrastructure costs? You know, Susan, in your experience with other RN tools, what have you found to be the challenges in this area?
Susan Manupelli: Sure. I’ll talk first about DOORS Next Generation. You know, DNG’s part of the ELM suite of products, that’s based on the Jazz architecture. It’s a very complex architecture. There’s a large number of servers you need, or VMs, to be able to stand up the solution. There’s an app server or some version of WebSphere. There’s a DB server for every application. So at a minimum with DNG, in addition to the app and DB server, you also would need a JTS server, an additional reporting server, [inaudible 00:02:08] or Data Warehouse. And if you have configuration management enabled, then there’s two additional servers that come with that, so for the global configuration manager and the LDX server. So-
Preston Mitchell: Interesting.
Susan Manupelli: And then of course, if you use any of the other applications of the ELM suite, there’s a server and database for those.
Preston Mitchell: Yeah, that’s quite a contrast to Jama, where we just require one application server and then a database server, which could be shared, actually, with other applications. Of course, that’s as far as self-host customers. Cloud customers really have no IT infrastructure costs at all, and I think that’s one of the biggest benefits of adopting a tool like Jama Connect. Okay, great. Next, I’d love to talk about the human or FTE maintenance costs that go along with tools. Susan, what’s your experience with other requirements management tools around the FTE costs?
Susan Manupelli: Sure. I’ll start off with DOORS Classic, which is an older client-server technology, and what I mean by that is that every user had to have software installed on their computer that was compatible with the server, so it was what we referred to as a thick client. An upgrade or maintenance of that would mean pushing out updates to however many users you have in your organization, potentially could be hundreds. So there was a lot of logistics involved with trying to get that upgrade done.
Preston Mitchell: Got it, and yeah, I imagine that’s downtime for the users, and a lot different than just a web-based tool that I sign in with my browser. The other thing that I know in working with customers that have migrated from DOORS Classic is DXL scripts and customization. Maybe you could talk a little bit about the hidden costs with those things.
Susan Manupelli: Yeah. Basically, any kind of customization that you want to do in DOORS Classic, you had to have somebody that could write a DXL script for it, that’s kind of a specialized skill, so there were costs with maintaining those, and particularly if they were used by across the organization.
Preston Mitchell: Is that any better with DOORS Next Generation?
Susan Manupelli:With DOORS Next Generation, there’s no DXL scripting or anything like that, but the thing that’s challenging with DOORS Next Generation is the upgrades and maintenance. Upgrades were often very complex and time-consuming. There was pretty high risk of failure, and then of course you have the time involved in roll back and trying it again. There’s also the ongoing maintenance of the middleware, would require a highly technical admin with some specialized skills in maybe database optimization, so Oracle or Db2. Also, keeping the system running optimally requires a full-time, highly skilled administrator for the ELM suite.
Preston Mitchell: Really? Full-time just for the backend? Wow.
Preston Mitchell: Yeah, that’s definitely different than kind of what our self-hosted customers experience. I mean, we try to make the self-hosted upgrades very easy and straightforward. It’s a button click in the admin console. And then obviously, for the majority of our customers who use our cloud solution, there’s really no upgrade or maintenance that they have to do at all. We push the upgrades for them. We handle that for them in an automated process, that’s validated and verified. So yeah, definitely different. Well, let’s transition to talk about adoption costs, and I want to bring my screen share up again, because you and I have spoken about really the opportunity costs of not using best-in-breed tools or processes, and it kind of really comes down to measurement. We really believe using Jama Connect, we can reduce the negative product outcomes, because we can help you measure your process performance. As management guru, Peter Drucker, said, “If you can’t measure it, you can’t improvement.” So Susan, maybe you could touch on what I find are the three primary ways that we can help our customers measure their performance.
Susan Manupelli: Sure. First of all, we can measure the quality of the requirements. This means properly define… making sure the requirements are properly defined, that they’re complete and consistent. And we actually have a new product, Jama Connect Advisor, that helps in this area. As far as the digital engineering, we can measure the level of collaboration that’s happening in the tool, the number of reviews, and the output from those reviews. And then also for live traceability. Traceability is one of the key reasons why people use a requirements management tool, and Jama does it better than any other tool that I’ve used. And in addition, we can measure how well you’re actually capturing that traceability.
Preston Mitchell: Yeah. And speaking to that, especially on the live traceability, we have for our cloud customers, this great benchmark, where we anonymize all the data, and you can actually see how you stack up against your peers in the industry with regards to the traceability completeness of your projects. So some really great return on investment by utilizing our cloud offering and being able to see the actual performance compared to your peers in the industry. Ultimately, I think everyone realizes the later you are in a product development lifecycle, it’s much more expensive to actually fix any errors that are found. So our whole goal at Jama Connect is really to lower the total cost of ownership, but really actually make your product development less costly by finding and fixing those errors way earlier in the cycle, in the requirements definition phase. Well Susan, thanks again for the quick chat, and sharing your perspective on cost of ownership. Appreciate it.
Susan Manupelli: Great. Thanks, Preston.
Preston Mitchell: Bye, everybody.
Is your data working for you? A consistent and scalable data model is instrumental for achieving Live Traceability™ and making data readily available across the development lifecycle.
Thank you for watching our 10th and final episode in this series, Jama Connect vs. IBM DOORS: Total Cost of Ownership. To watch other episodes in this series, click HERE.
Jama Connect® vs. IBM®DOORS®: Requirements-Driven Testing: A User Experience Roundtable Chat
Increasing industry challenges and complexities are pushing innovative organizations to consider modernizing the tool(s) they use for requirements management (RM). In this blog series, Jama Connect® vs. IBM® DOORS®: A User Experience Roundtable Chat, we’ll present several information-packed video blogs covering the challenges that teams face in their project management process.
In Episode 9 of our Roundtable Chat series, Mario Maldari – Director of Solutions Architecture at Jama Software® – and Susan Manupelli – Senior Solutions Architect at Jama Software® – discuss requirements validation, verification, and testing in addition to demonstrating test management in Jama Connect.
To watch other episodes in this series, click HERE.
Watch the full video and find the video transcript below to learn more!
VIDEO TRANSCRIPT:
Mario Maldari: Hello, welcome to the ninth edition of our vlog series. Today, we’re going to be talking about something that’s very important in requirements management, something that I’m particularly passionate about, and that’s requirements validation, verification, and testing. And I’m joined by my friend and colleague once again, Susan Manupelli. Susan and I have worked together for a long time, 15 years plus testing various requirements management tools using various techniques, and various software. I believe the most recent software you were using was IBM’s enterprise test management tool, something we used to call RQM. Looking back on all those years and all those tools you feel as though have been your biggest challenge.
Susan Manupelli: So talking about the ELM suite where we were talking about rational quality manager and also we were using that to test DNG. Really the issue, the biggest challenge is that they were two separate tools. So even though they were part of the same tool set, the UIs were completely different. They were very inconsistent in how you would use them. The review and approval aspect of RQM wasn’t that great. And again, it was completely different from the review and approval that you would get when you were working with DNG. And also because they were from two separate tools, in order to really get the traceability, that would be a challenge. You’d have to do reports that were outside of the individual tool tools. And then one of the biggest things too was the comparison. Things changed in RQM. It was not easy to find out what changed, even if you compared one test case to another.
Mario Maldari: Yeah, I recall some of those challenges. I think for me, the biggest challenge I had was the UI inconsistencies like you mentioned. Obviously, I was in one tool, I’d go to another. It’s completely different experience, completely different nomenclature. And then having to integrate between the tools and just frankly having to go to a separate tool to do the testing was problematic and challenging sometimes. So I think you hit an important topic in terms of having everything in one tool. And I’d like to show you how Jama does that. Okay. So in Jama, the fact that we have testing integrated into the tool allows you to do some pretty neat things. So as you can see here on my desktop, we have this dashboard, and I can define a relationship rule diagram in Jama where I can define that I want specific requirements to have validation points and test cases associated with them.
And so what that gives me is I can create some dashboard views for requirements, lacking test coverage, or I can even look at test case summaries. Right on the dashboard, I can look at test case progress, the priority of my tests. Jama even allows you when you’re testing to log defects. So I can track my defects here. And so for you and I, we always have to provide test case reports and summaries up through management, up through the development team. And so this allows you to have it all in one spot, which is really nice to have. So the testing itself in Jama, you basically enter it on the test plan tab and very similar to the way you and I worked, we have a concept of a test plan where you can define your test intent, the things you’re going to be testing, your approach, your schedule on your team, your entry criteria, your exit criteria.
And from there, as you pointed out, you can send this for a review and you can get an official sign-off from your development team or whomever you need to sign off on your test plan. And then once that’s in place, you can go to your test cases and you can start to group your tests according to functionality or whatever makes sense for your grouping and your organization of your suites of tests. And once they’re grouped, you can come to the test runs and this is where you actually will be doing your execution of your test. So I can click on one of these here and can start an execution and I can start to go through each step and pass or fail as I go through. And the nice thing about Jama, as I mentioned, is that you can actually go ahead and log a defect in real time and I can go ahead and log this defect.
And now when I’m saving this defect, it’s associated with this test execution run, which is associated with my test case, which is associated with multiple levels of requirements upstream. So now if I look at a traceability view, I will see my high level requirements traced all the way down to the defects. When I have logged a defect, I can actually go in and I can take a look at this test run and I can see the defects. And if I have something like an integration to another product like Jira for example, maybe my development team and is working in Jira and they love Jira, it automatically populates the defect in the defect tool like Jira. So a developer can come in here, they can make some changes, they can put in some comments, they can change the priority, the status, and all of that gets reflected back in Jama.
Mario Maldari: So really nice integration if you’re using something like Jira. From my perspective too, what would’ve been nice in my past test background is to have this concept of suspect trigger. And so if I look at the relationships for this particular requirement and I see that downstream there’s a validation of a test case, which is validated by length type, I can see that it’s flagged as suspect. So that means that something upstream has changed and my downstream test case is now suspect. And what does that mean? Maybe I need to change it, maybe I don’t. How do I know? I can come to the versions and I can say, “Well, the last time I tested this requirement was in our release candidate one, and what’s different now?” So I can compare our version three to version seven, run our compare tool, and I can see exactly what changed.
So as a tester, this is great to me, it’s not enough to know that something’s changed. I can actually see exactly what changed and maybe it’s just a spelling update and I don’t need to really change it. Or maybe it’s something more substantial like you see here. And at this point I can come in and I can make my change to my test and I can go ahead and I can clear the suspect flag.
So really nice level of granular control. What’s also good with the Jama’s we have these out of the box, and you’ll like this, Sue, out-of-the-box canned reports that have summaries of your tests, how many blocked, how many failed, how many passed executions. So these are canned reports that come with Jama. If you needed any customized reporting for your specific needs of the organization, we have that available as well. So really nice back to your point about having everything in one tool, this is it, and this is the benefit. Now, I know you’ve been at Jama for just about six months now. I’d love to hear your impression of the test management built-in, what your thoughts are there?
Susan Manupelli: Oh, sure. Yeah, I do. I definitely love how everything’s in one tool and the ease with which you can just trace, actually verify the testing of your requirements. You can just go from requirements straight down to multiple levels of decomposition to your test cases. So you can see, answer the question, did your requirement are your requirements passing, which is great. And also the ability to display related queries right on the dashboard. I think that’s a huge plus the consistency of the UI between what you do for requirements, creating a test case isn’t any different than creating any other requirements.
So it’s a very familiar UI for both operations, which I think is important. The review and approval piece is really a nice strong point for Jama, and to be able to apply that to reviews for test cases is really great. And I just think it’s a really streamlined UI. It really has everything you need and nothing that you don’t. So I just think it’s a great tool. And then there’s one other aspect that I really like is the impact analysis. You mentioned being able to trace when something’s changed after the fact. It’s also to be able to say, “Hey, we’re looking at making a change here.” There’s one button in Jama, you click that impact analysis and it tells you all of your test cases that you might need to revisit if you make that change.
Mario Maldari: I call that the proactive method.
Susan Manupelli: Yes.
Mario Maldari: Yeah, the impact analysis is extremely important. And if you were a developer in an organization and you changed a requirement or you were about to change a requirement and you knew you had 30 tests that are associated with that, you could run the impact analysis. See all of those, and you could proactively warn your test team, “Hey guys, I’m about to make this change. Here it is. I’ll explain it to you. We can have a separate review and approval.”
So it really contains all of that and controls all of that for you. I’ve often said to people, it’s one thing to have your requirements in a tool, and that’s the first step. Define your requirements, have your traceability. But if you’re not doing your testing and validating those requirements, then how do you know that you built the right thing, right? So extremely important aspect testing to requirements in the supply. So any requirements gathering process so I’m glad we could talk about it today. Sue, glad I could have you to talk to about it. And I’d like to thank everyone for their time and thanks for participating in the vlog series and we’ll see you on the next one.
Is your data working for you? A consistent and scalable data model is instrumental for achieving Live Traceability™ and making data readily available across the development lifecycle.
Learn how you can supercharge your systems development process! In this blog series, we’re pulling back the curtains to give you a look at a few of Jama Connect®’s powerful features… in under five minutes.
In this Features in Five video, Katie Huckett, Senior Product Managerat Jama Software®, walks viewers through Document View, a new feature offered in Jama Connect.
In this session, viewers will learn how Document View, now available alongside list and single-item views, allows users to:
Author, read, and edit items in line in a single view while maintaining an item-based structure within project hierarchies.
Improve consistency and accuracy of requirements quality by incorporating built-in support for Jama Connect Advisor™, an add-on to Jama Connect.
Jama Connects complete requirements authoring solutions supports different use cases and different preferred user work styles such as those previously performed in siloed tools like Microsoft Word or Excel.
With Document View, you can leverage all the functionality and toolbar actions of reading view, such as filtering and configuring items, reuse, batch transition, send for review, edit and more. Double-click on an item to open quick edit mode with the option to expand to full edit mode. Insert new items without losing your place in the document, add comments and lock or unlock items.
Follow along with this short video below to learn more – and find the full video transcript below!
VIDEO TRANSCRIPT:
Katie Huckett: Hi, my name is Katie Huckett and I’m a senior product manager here at Jama Software. In this video, I’m going to walk you through Jama Connects new feature Document View. Jama Connect now provides Document View, alongside list and single item view. Document view allows users to author, read and edit items in line in a single view while maintaining an item-based structure within project hierarchies. Document view improves consistency and accuracy of requirements quality by incorporating built-in support for Jama Connect Advisor™ and add-on to Jama Connect. Jama Connects complete requirements authoring solutions supports different use cases and different preferred user work styles such as those previously performed in siloed tools like Microsoft Word or Excel.
With Document View, you can leverage all the functionality and toolbar actions of reading view, such as filtering and configuring items, reuse, batch transition, send for review, edit and more. Double-click on an item to open quick edit mode with the option to expand to full edit mode. Insert new items without losing your place in the document, add comments and lock or unlock items.
Let’s see what this looks like in Jama Connect. Here in Jama Connect, I wanted to start on the current reading view so that you can see as I toggle over to our new Document View the transition to the new, clean, modern design. We’ve removed the horizontal lines between the items for a more seamless document experience. The item ID and current version are visible under the item name and comments and locking functionality have moved to the right of the item name so they don’t get lost within the content itself. Use the edit feature to quickly edit items without changing views or manually tracking your place in the document. I’ve opened what we call quick edit mode, which is a condensed form of fields only visible on the current view, as well as any additional required fields that you may have missed that need to be completed in order to save the item.
If you need to see the additional fields available for this item, expand to full edit mode and then you’ll be able to access any additional fields that you need. Quickly return to quick edit mode to complete any edits that you need before saving and completing your work. As I mentioned previously, Document View provide support for Jama Connect Advisor™. As you highlight text in a rich text field that you have enabled advisor for, you’ll notice an analyze button beneath the field. As you analyze the results, you’ll then see any recommendations that have been found. Click the view details button to see the information in more detail.
Huckett: Create new items and Document View with our new inline insert. I’m going to insert a new item between item one and two here, so I have a new requirement that needs to go in here. So you’ll see as you hover between the items, you have a plus button for inline insert form, and I’m going to go ahead and insert a new design description. You’ll notice that our inline insert form is very similar to the quick ad functionality that’s available in the ad dropdown in the content header. Only the name and description fields are visible, name being the only one that’s required. We are bypassing any additional required fields at this point so that you can quickly add as many items as you need to and then go back and edit in more detail and fill out the remaining required fields.
So you’ll notice I’ll add in a name and description into this item. You’ll note the Jama Connected Advisor analysis is also available in the inline insert functionality. We’re going to save this item. You’ll receive a toast message that lets you know your item’s been created, and you’ll see that new item appear in between items one and the previous item two that I had before. So as I mentioned, there is an additional required field on this item that I did not complete before. So I’ll go back in, edit this item, find that additional required field and assign someone to it so that we can then fully save and complete this item for the time being.
In order to view comments, you’ll click on the comments icon next to the item name. After clicking on the icon, you’ll see the comments stream up here in a modal above Document View where you can interact with, comment and reply to any comments on the item. Next, I’ll take you over to the admin section for your Jama Connect administrators to customize and configure Document View and Jama Connect Advisor™ to your organization’s needs. For each item type, it can be configured for default Document View settings. You’ll find a new projects Document View option in the view dropdown where you can then place your default visible fields. Jama Connect Advisor™ can be turned on for any rich text field on any item type your organization chooses and left off for any item types that don’t need the analysis.
Huckett: When you open a rich text field on an item type, you’ll notice a brand new checkbox for Jama Connect Advisor™. Enable advisor for that particular item type field and save your configuration either before or after the individual item field configuration for Jama Connect Advisor™. Don’t forget to go into the dedicated admin section to enable the INCOSE rules in whole or selectively based on your needs and the EARS patterns.
For more information about Document View, please contact your customer success manager or Jama consultant. And if you would just like to learn more about how Jama Connect can optimize your product development processes, please visit our website at jamasoftware.com. Thank you.